Building A Log Pavillion
In 2012 I had a vision that we were going to build a pavilion that could be used for get-togethers, youth groups, and other things so I saved the design in my memory for later. The property we owned at the time didn’t allow a proper space for one, however we were planning on moving anyway so it became part of the search criteria for potential properties. I found a perfect piece of property on the Clearwater River south of Forks Washington, but we were never given an opportunity to get it as the nature and bird clubs with huge donor money made buying and properties like that unattainable to the average working person’s budget. In hindsight it was a blessing in disguise as the political climate in Washington turned bad and the resulting sky-high taxes, fees, restrictions, and cost of living caused us to flee that state while we still could as we saw the ship was sinking and there were only a limited number of life boats on board. That is how we ended up in Willow Alaska and this vision finally came to fruition in 2025.
We found a fixer-up house with some acreage that fit all of our needs, so we purchased it. The property had lots of space for expansion but seeing that we got a once in a lifetime deal on it (As is with lots of cleaning and fixes) we knew that good things were in store for us later. A pavilion wasn’t anywhere on the list yet as we had no way of getting the materials to build it, but the Lord knew that and provided them later when the time was right as we are going to look at now.
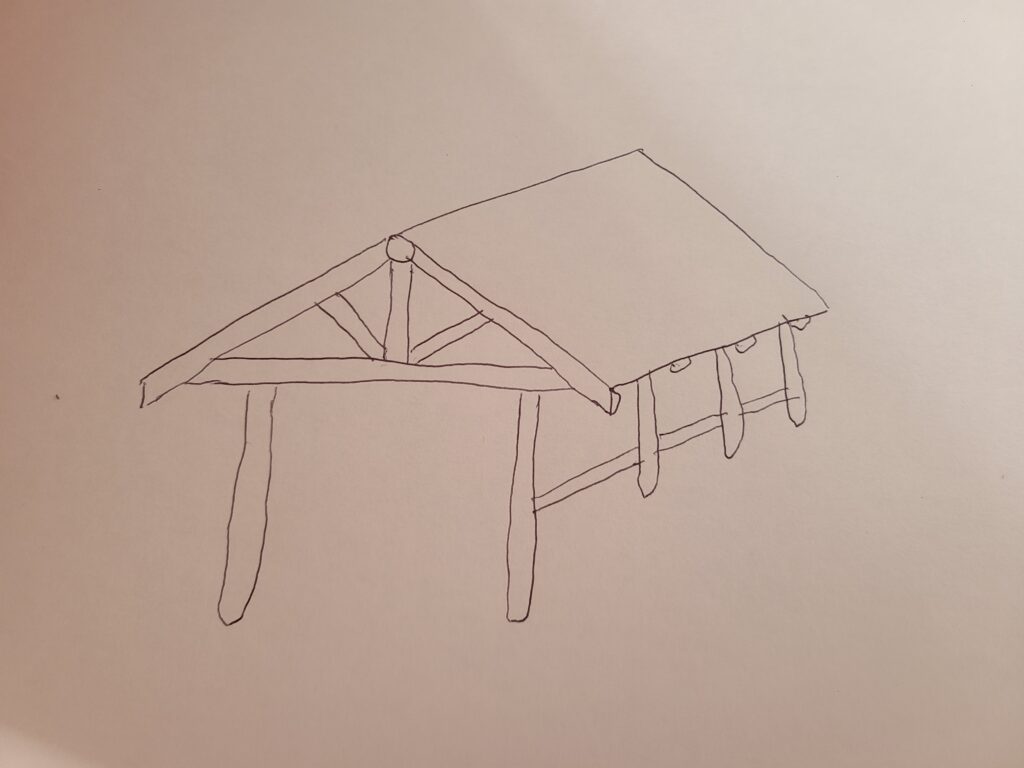
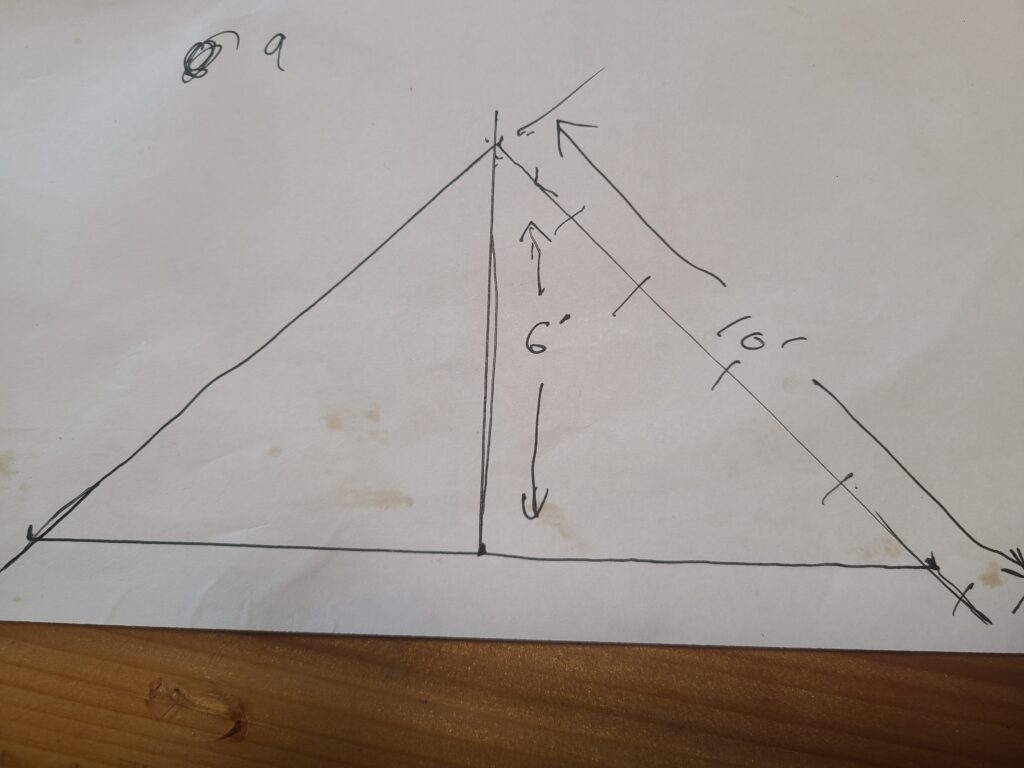
One of the local campgrounds was infested with beetle kill Black Spruce trees that were going to be cut down and removed to reduce the wildfire hazard as those beetle kill trees are highly flammable and go up in flames like an old dried out Christmas Tree. This meant a great opportunity to get logs (And firewood too!!) was happening and would provide all the logs that we needed to build a pavilion. I quickly sketched a picture of what I had visioned and drew out the trusses to scale so I could get reasonably accurate measurements of the lengths. I have built stuff before using logs and it is not a quick cut everything to length and nail it together builds. Every log and joint is unique requiring custom cuts, often on two ends of the log. Building with dimensional lumber is way easier and faster as everything is flat and square, but the prices for the posts and the trusses were beyond what we could afford so logs it was!
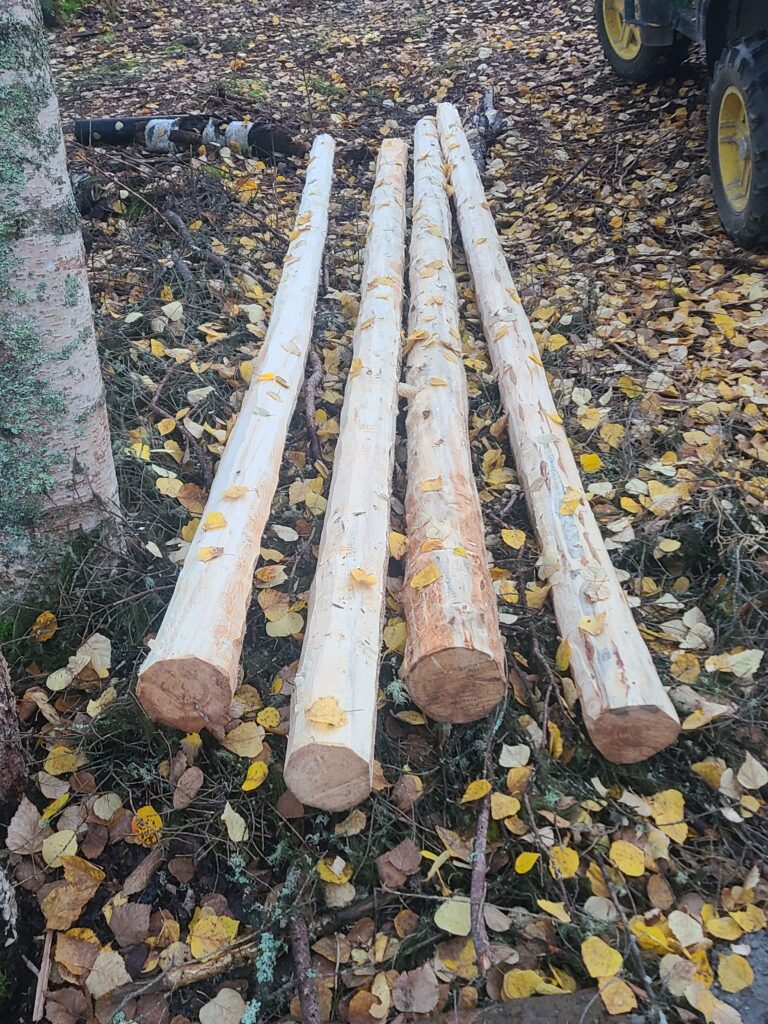
Picea mariana, the black spruce, is a North American species of spruce tree in the pine family. It is widespread across Canada, found in all 10 provinces and all 3 territories. It is the official tree of Newfoundland and Labrador and is that province’s most abundant tree. Its range extends into northern parts of the United States: in Alaska, the Great Lakes region, and the upper Northeast. It is a frequent part of the biome known as taiga or boreal forest. This slow growth creates tight growth rings, which in turn makes it very tough stuff. The trees don’t gain much diameter, so six-inch logs are the most prevalent, which makes it the perfect building material for a log pavilion or a smaller cabin or shed. It does have to be peeled and treated, or it will begin rotting in a couple of years.
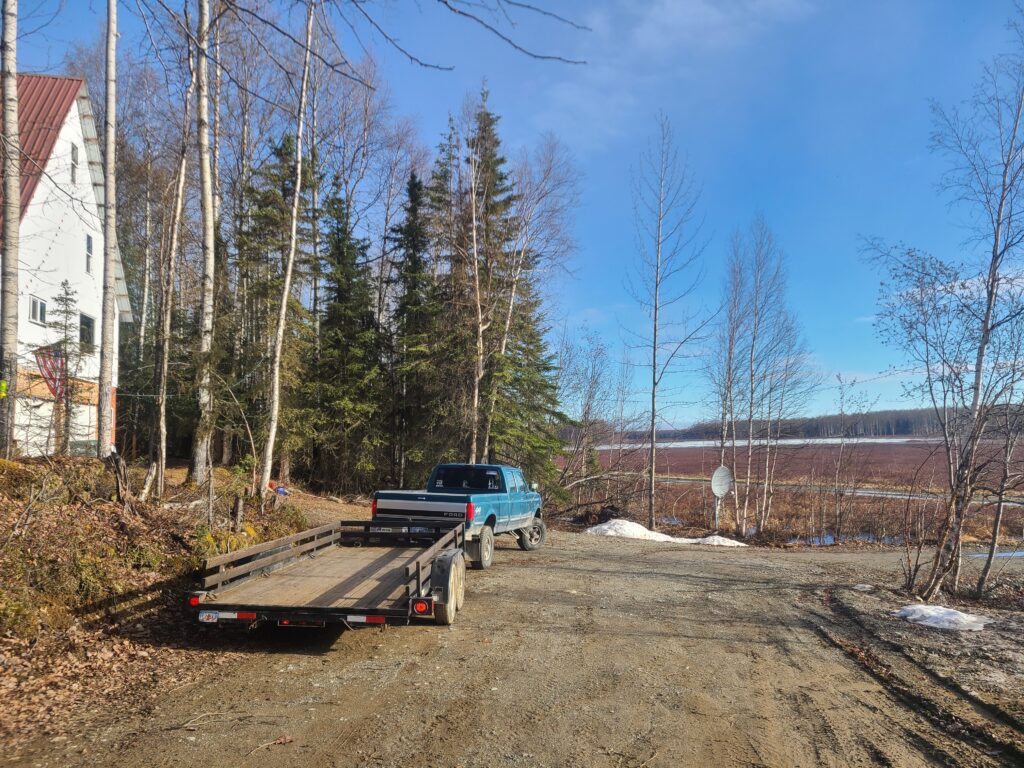
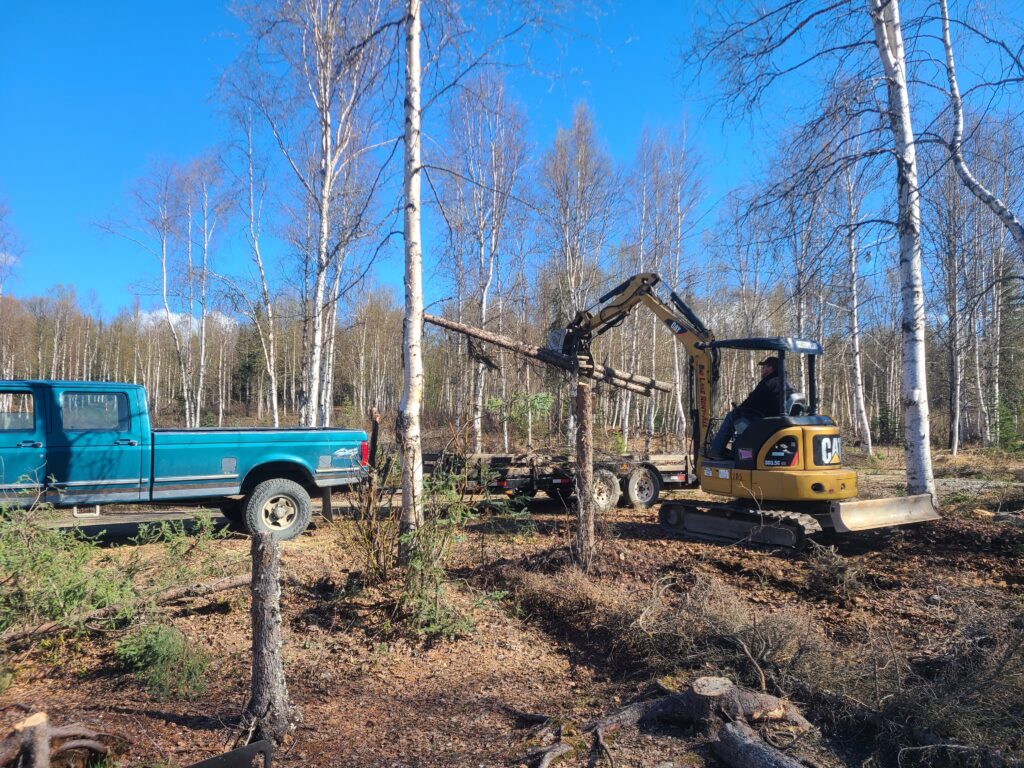
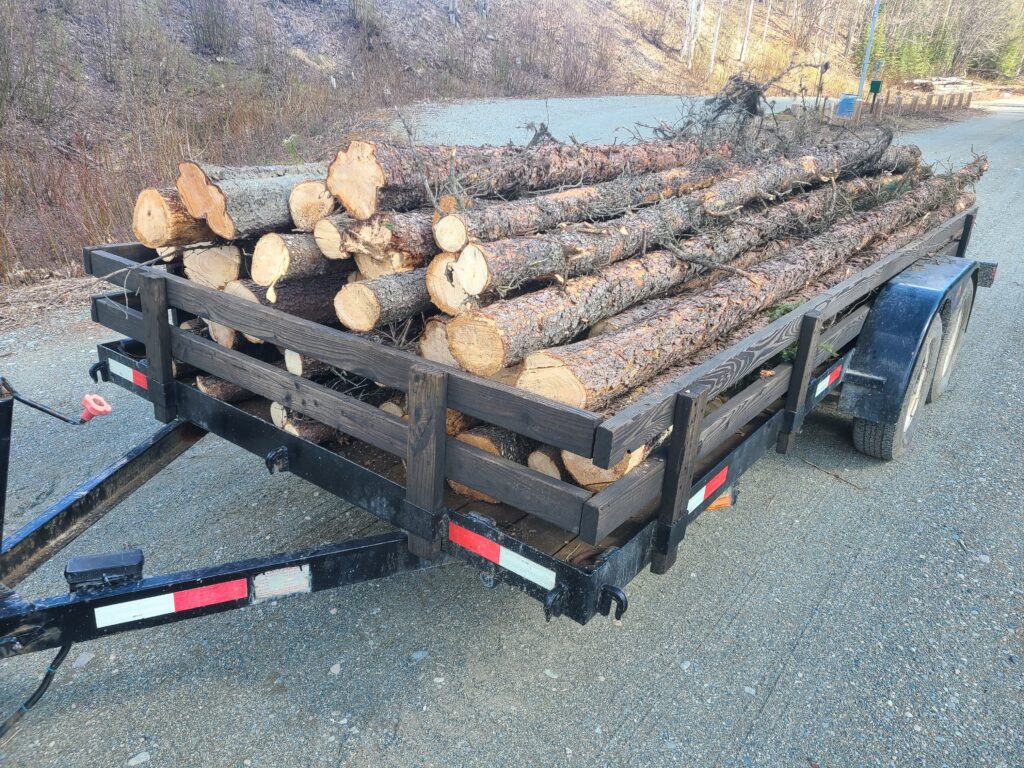
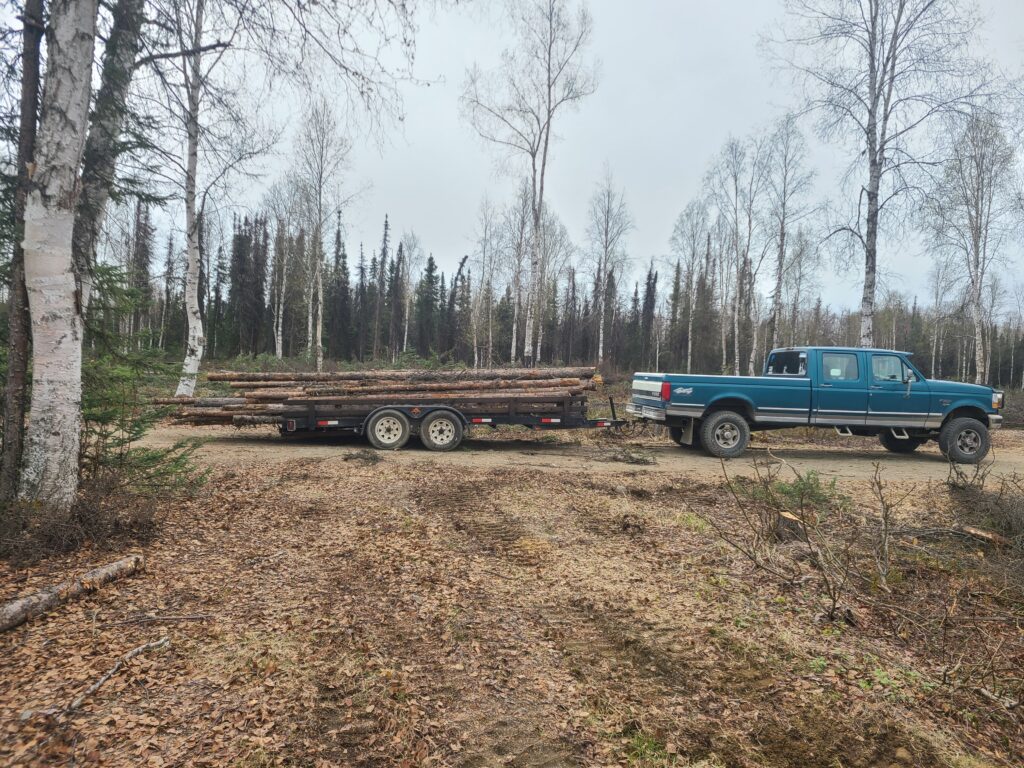
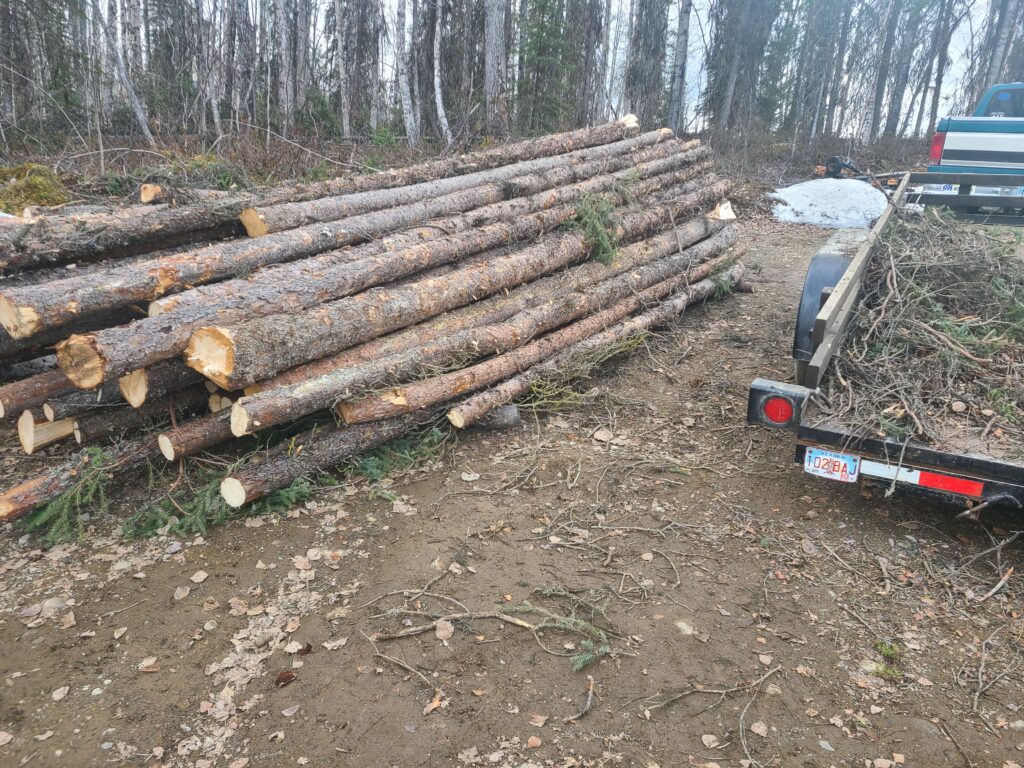
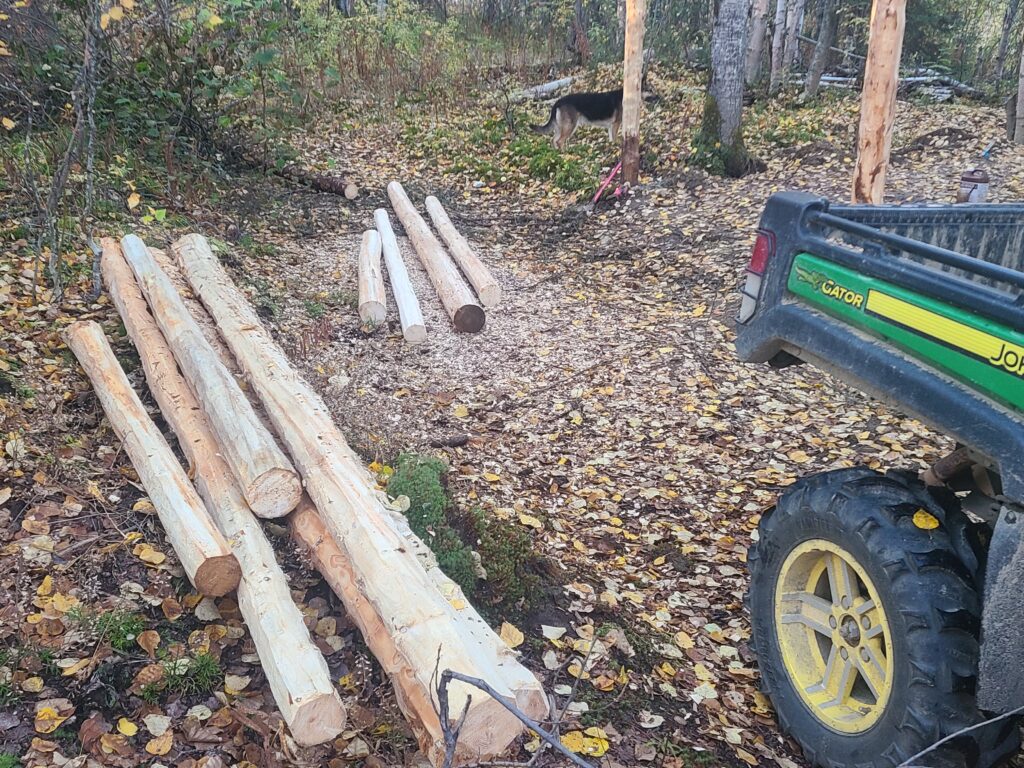
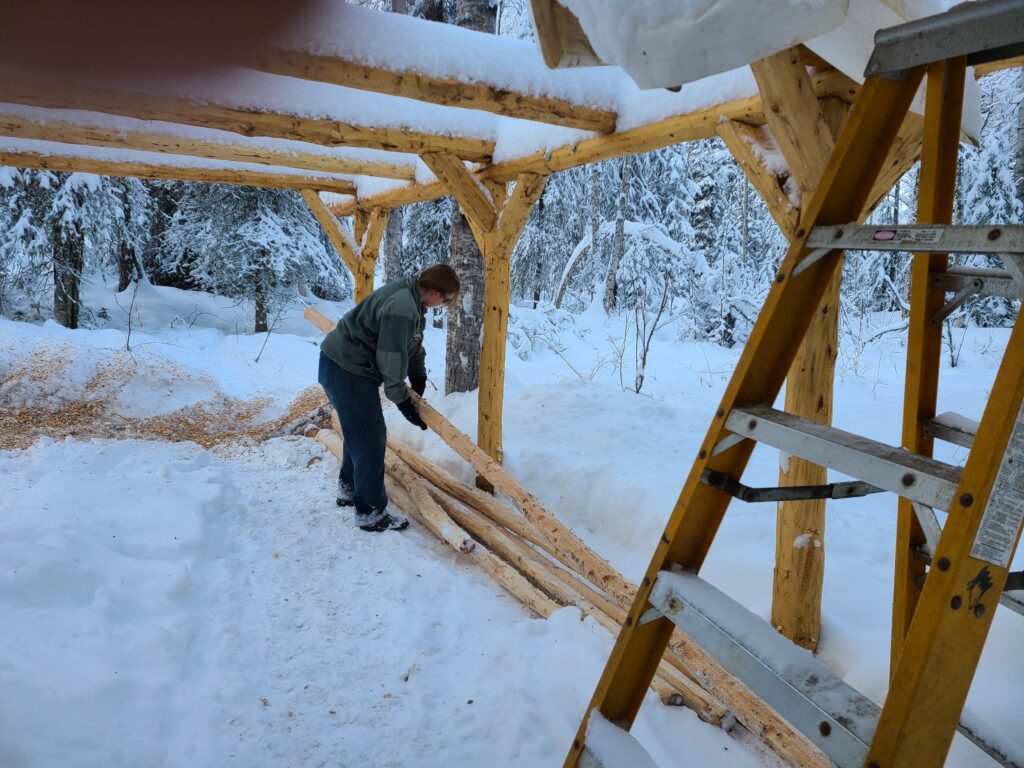
The dead and all the danger trees in the campground were finally cut down so I hooked up the car trailer so I could haul up to twenty-foot logs and grabbed the chainsaws. I selected three different types of logs, ones with larger diameters for ten-foot posts, mid-sized diameters for the trusses and other supports, and small diameter straight ones for the purlins. It is hard to tell which ones had just started rotting and which ones did not, so I got extra of each size as the ones with rot still make good firewood. I limbed and cut the trees to the desired log lengths so they could be brought out to the road using a mini excavator that was on-site. The mini excavator also made easy work of loading everything onto the trailer too. The standing dead trees were dry and extremely lightweight, so I ran out of room on the trailer before even nearing its weight capacity. I was able to get two good trailer loads along with a load of eight-foot poles in the back of my pickup, so that provided enough for the build along with a good buffer to cover the rotten logs. All together we would use just over one trailer full of logs, which was about six feet wide, three feet tall, by eighteen feet long in total volume, so it was a time-consuming process.
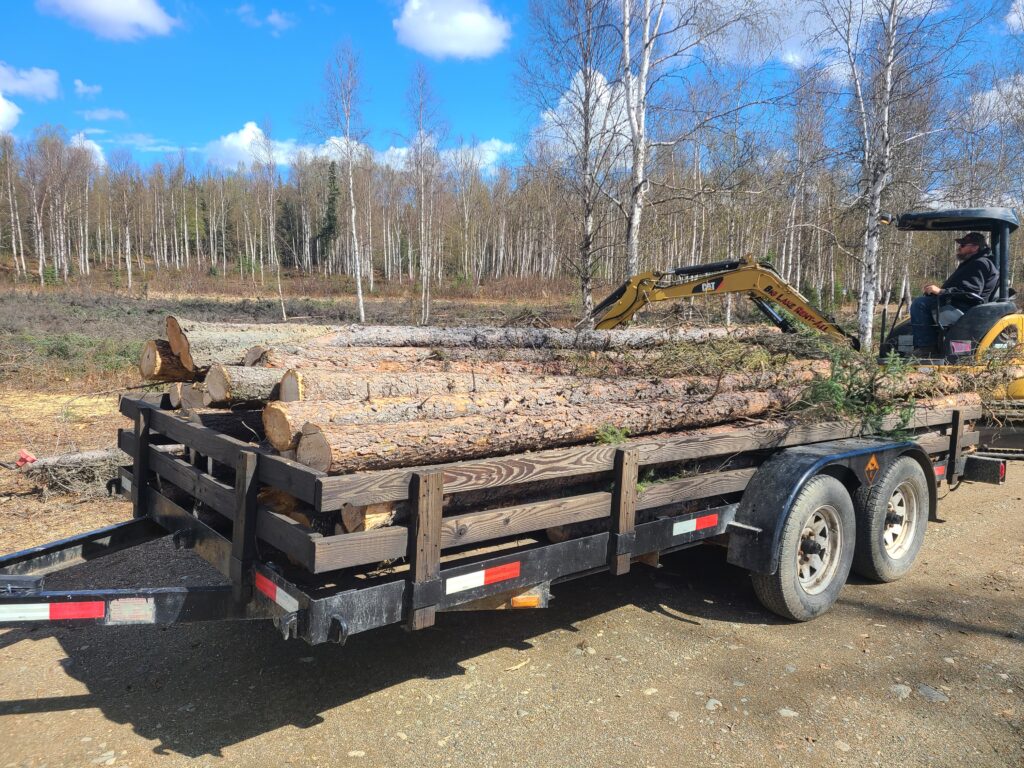
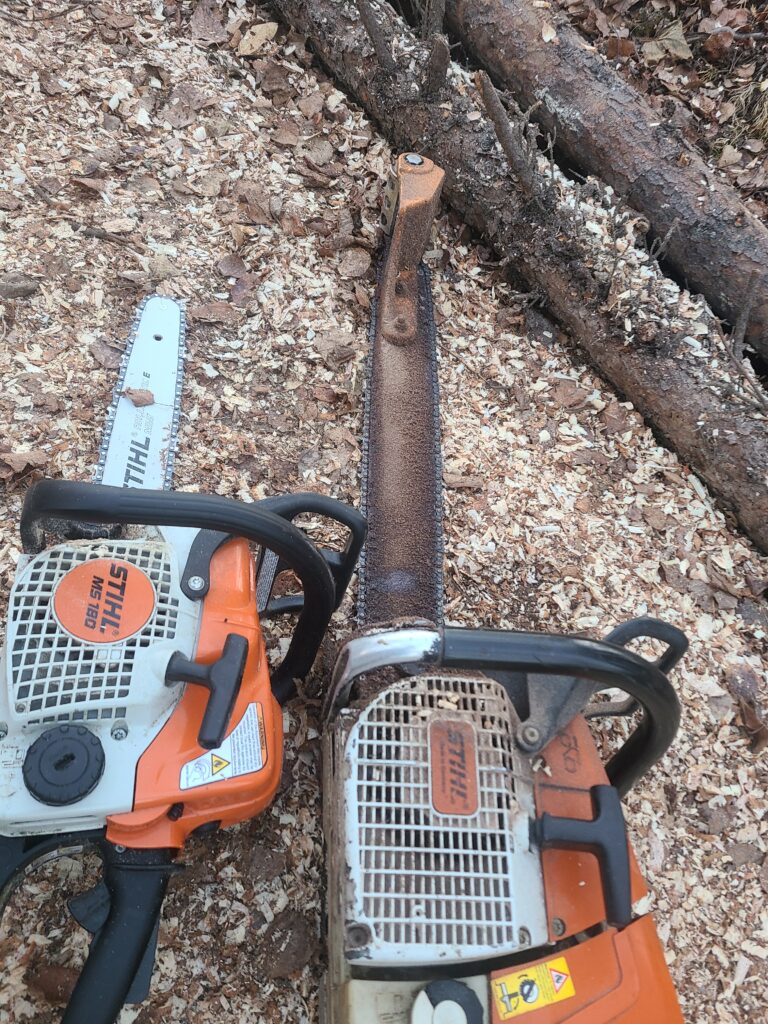
We bought a “Chainsaw debarker” from Amazon to peel the logs with. In past projects we used a draw knife to peel them by hand, but this was a massive project involving tons of logs, so it was well worth the $100. It takes a larger industrial sized chainsaw like a Stihl 440 or larger to power the debarker, so make sure you account for that if you don’t have access to one. We tried the debarker on a friends Stihl 290 and it burned up the clutch after one log, so don’t even attempt running one with a small saw. I drilled two holes in a 24” bar to mount the debarker onto the bar while using a 28” chainsaw chain to drive it. This setup worked really well throughout the entire operation with no clutch problems.
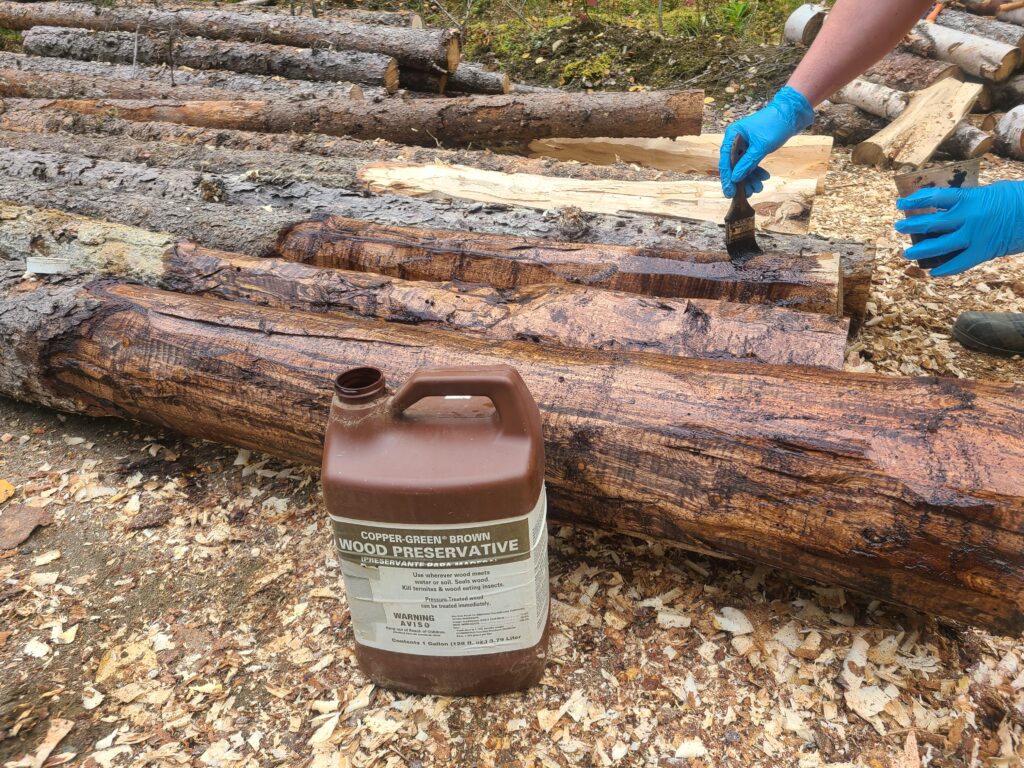
The log peeling went quickly using this, but the big chainsaw did give the back and arms a severe workout while peeling them. The debarker essentially consists of two planer blades so it also smoothed out the knots and other imperfections on the logs. One of our friends did a lot of the peeling, which was a major help that we greatly appreciated. Once the posts were peeled, we did multiple wood preservative treatments on the portions of them that would be in the ground plus a few extra inches above ground level to discourage any wood boring insects from even thinking about it.
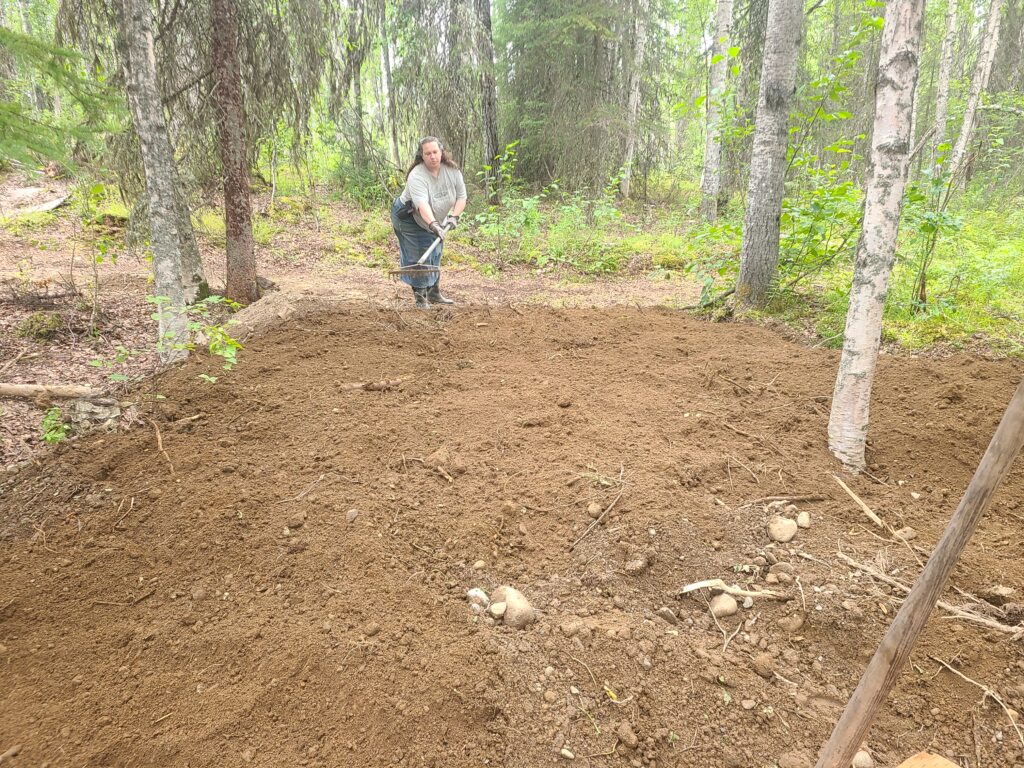
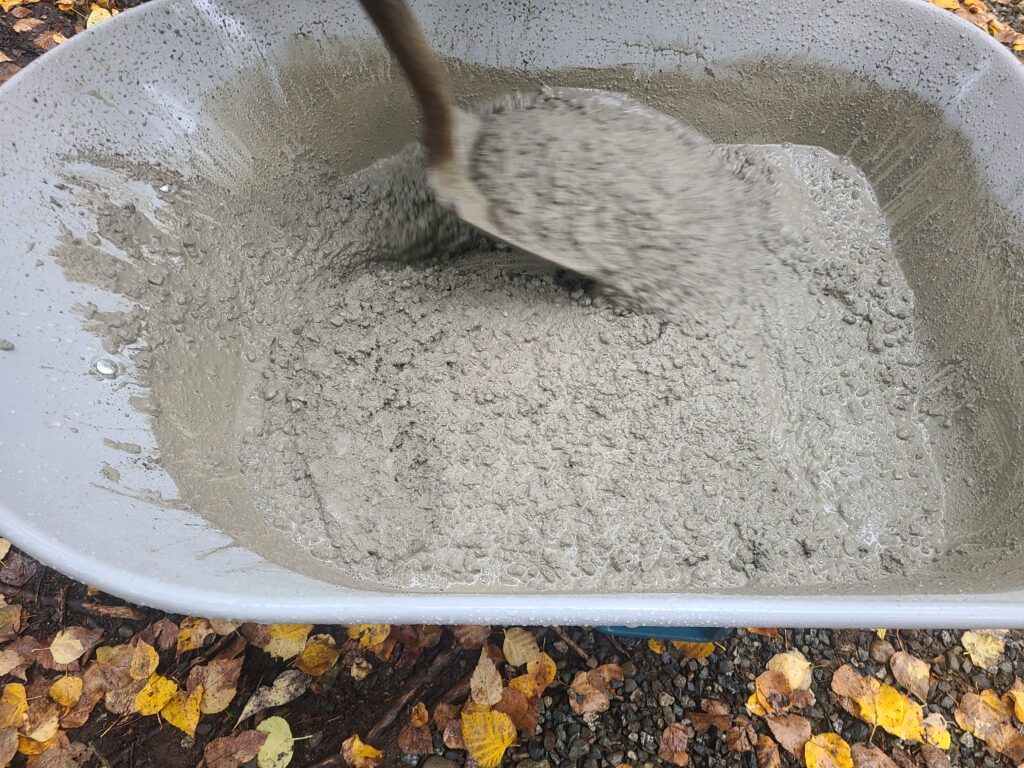
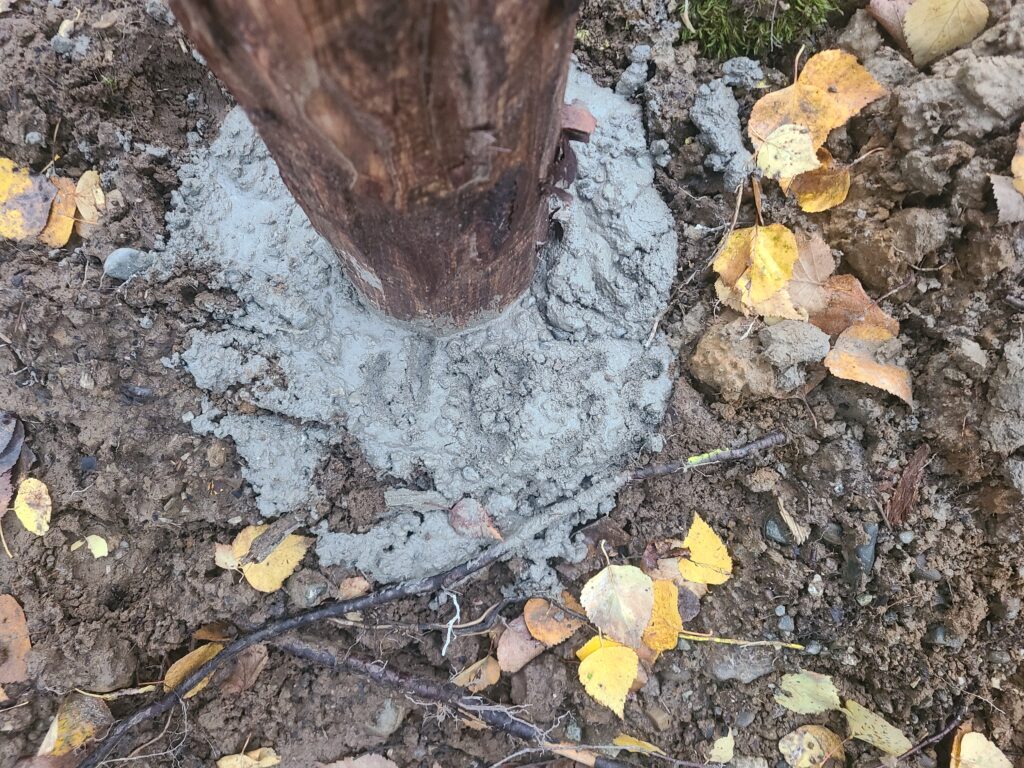
We selected a site behind the house and carefully measured out the post locations double checking the measurements as we went. We had previously used some fill dirt to bring the area up to a rough grade so we could do the finish grade later once we determined the final height of the floor. Holes were dug to place the posts in. We hollowed out the bottom of the holes to make a kind of bell shaped to help reduce the frost-lift later. Posts have a tendency to get push up by the ice when the ground freezes here, so we use this process for every post we set regardless of what it’s for. Some washed smaller drain gravel was place in the bottom of the holes to allow rainwater to drain into the gravel underneath and also to ensure the bottom of the poles stays as dry as possible. The holes were filled with cement after some temporary bracing was added to the poles.
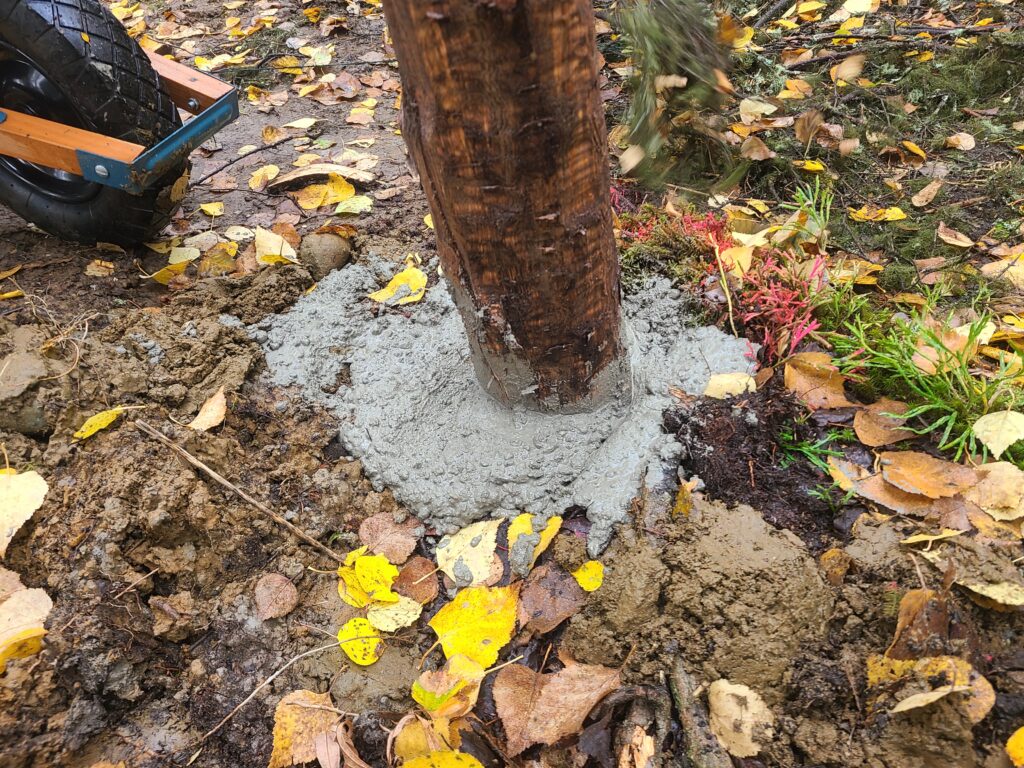


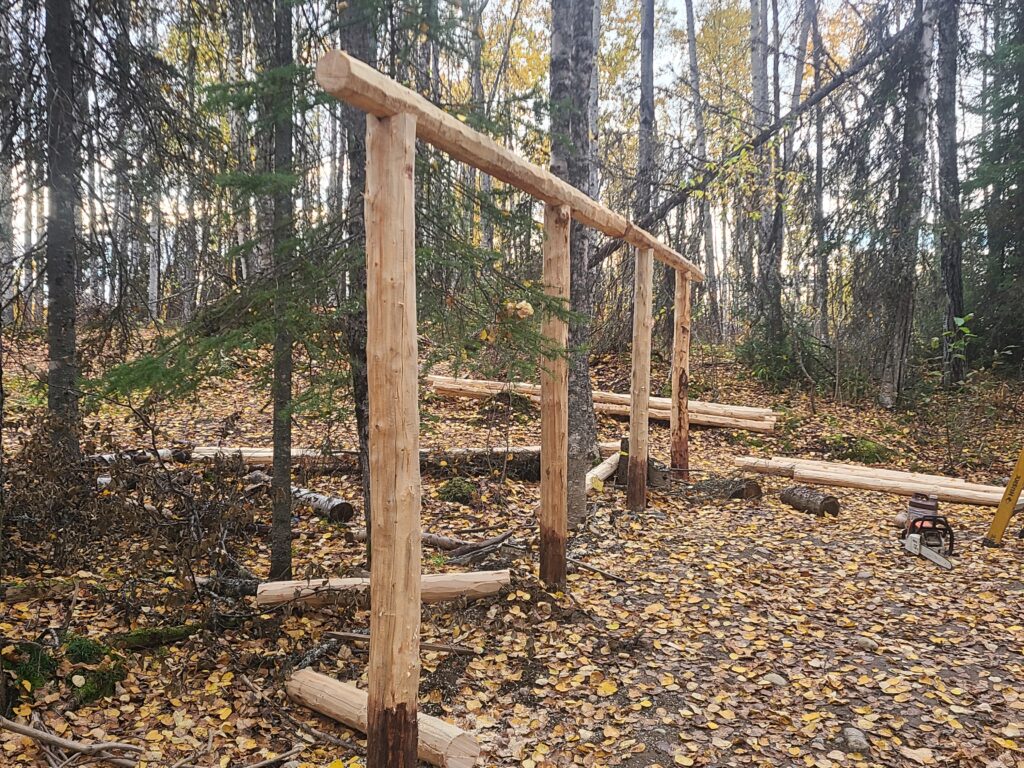
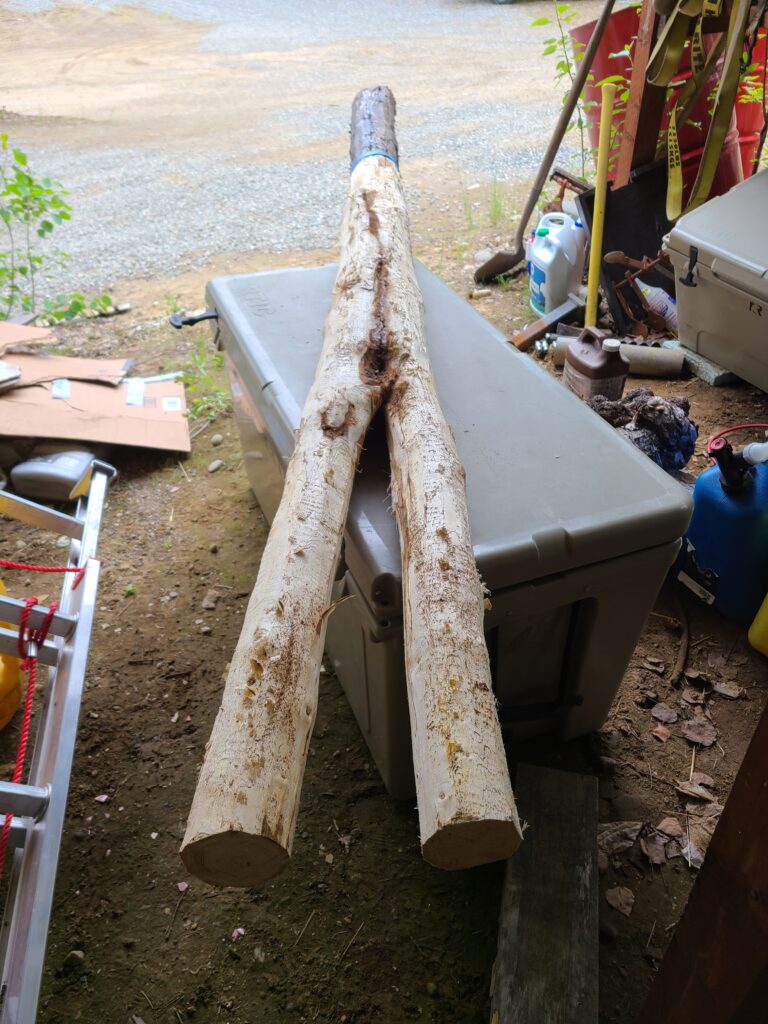
After the concrete had set we used a laser level to rough cut the poles to the approximate height. Logs are tapered so each pole height would have to be individually cut as we needed the top plate log to be level to make setting the trusses easier later. Logs aren’t perfectly straight so taking your time and don’t rush the cuts. It’s way easier to trim a little extra than it is to replace a log or a post so double check everything before making your cuts. This is the base for everything else so make it as good as possible given that the log dimensions vary the entire way. I just use averages by looking down the log and rolling it to get the straightest imaginary line possible.
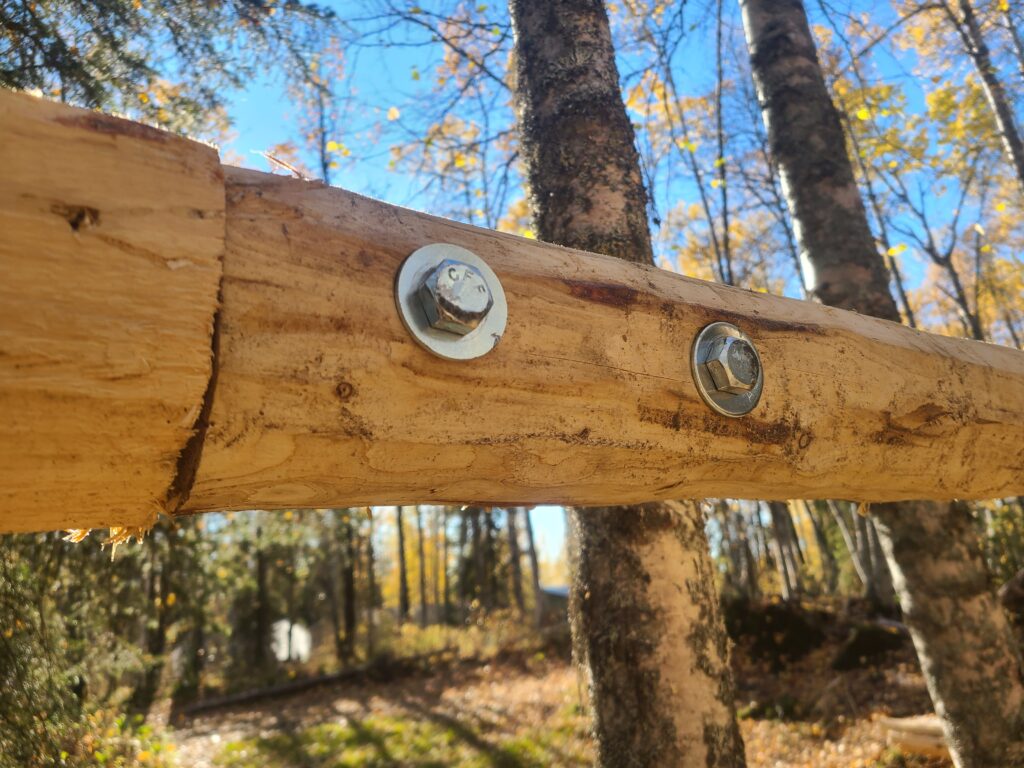
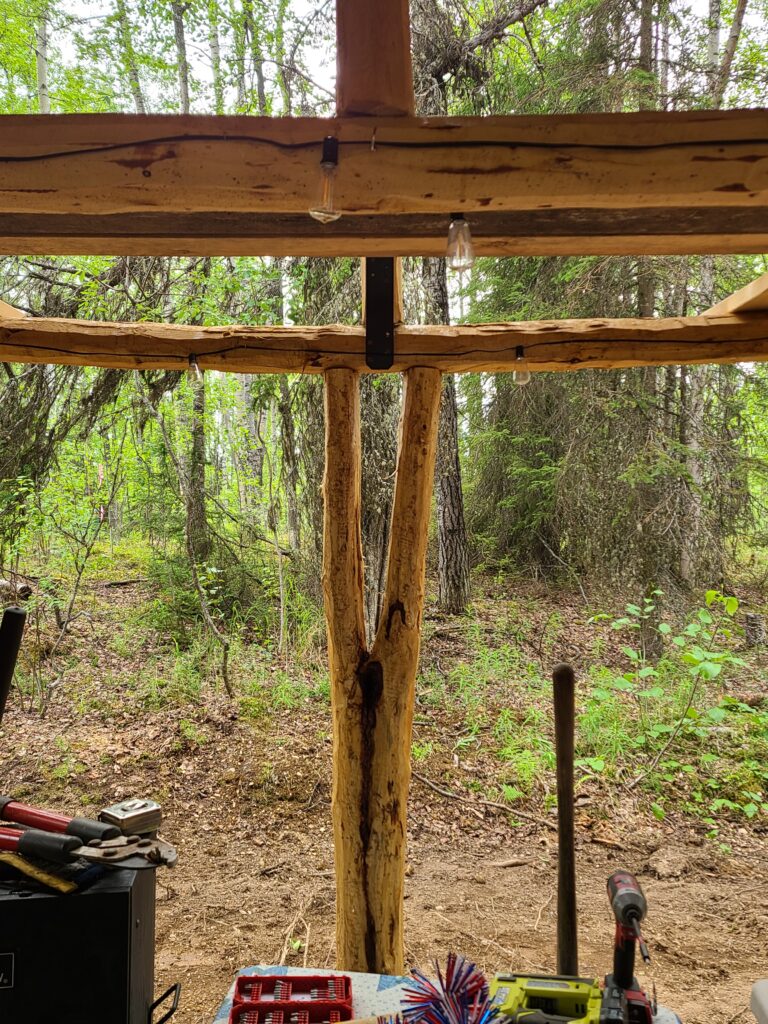
The overall top plate ended up being just over twenty-four feet long, as anticipated, so we used two shorter logs to span the distance A butt joint, through bolts, and outside wood glue was used to put the logs together. That sounds simple, but that means that you’re top of the post notches have to be made for a different final position along with accounting for keep the two joints precisely aligned in the final position so this was a major challenge that was time consuming, but well worth it to make the rest of the build easier.
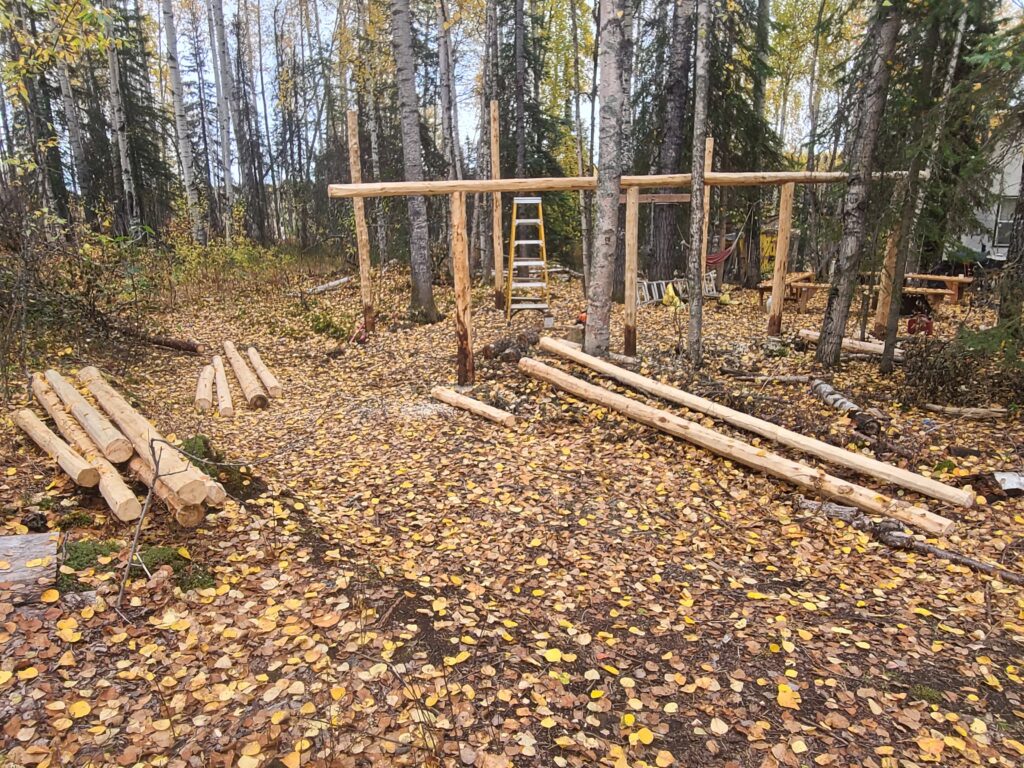
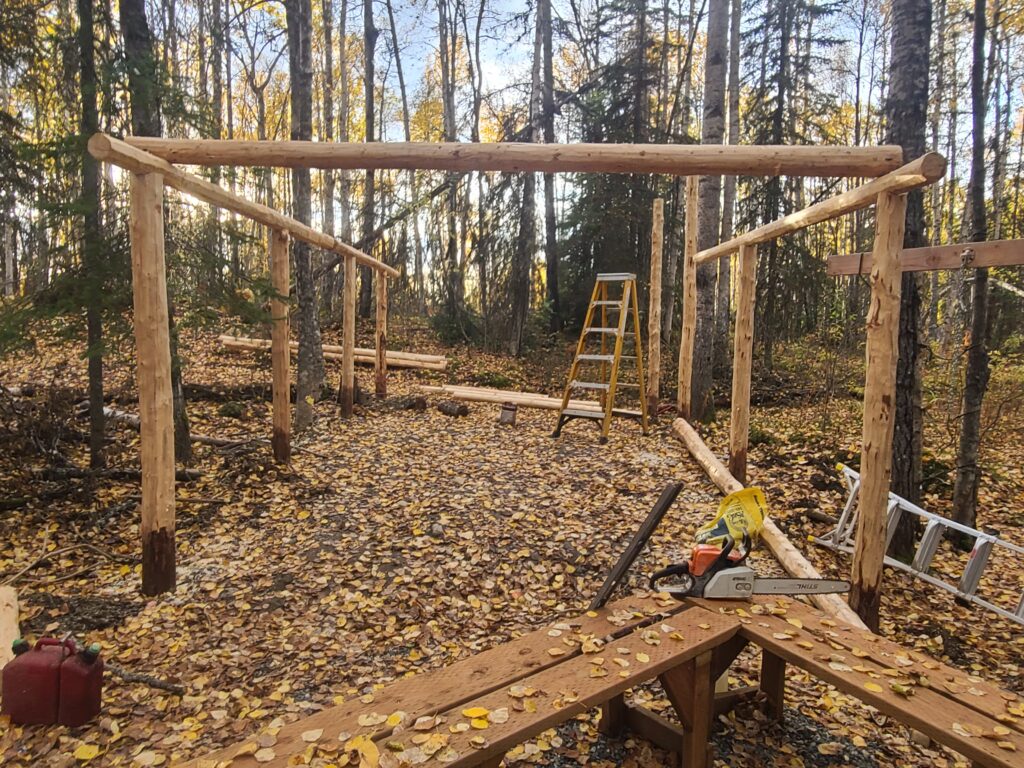
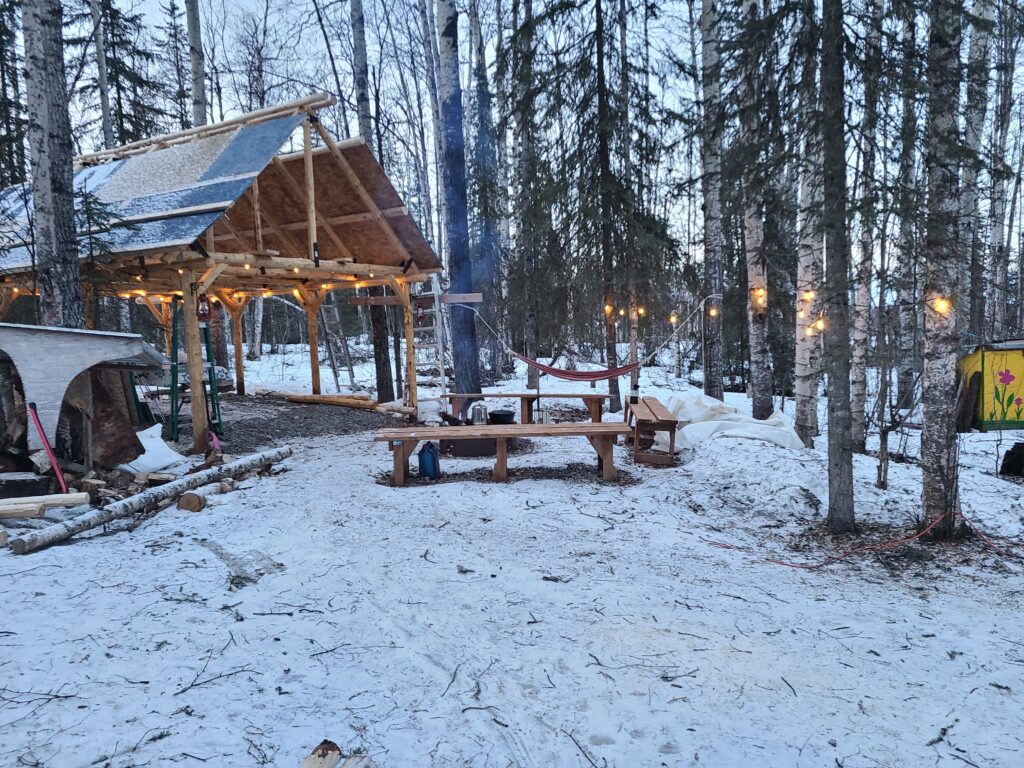
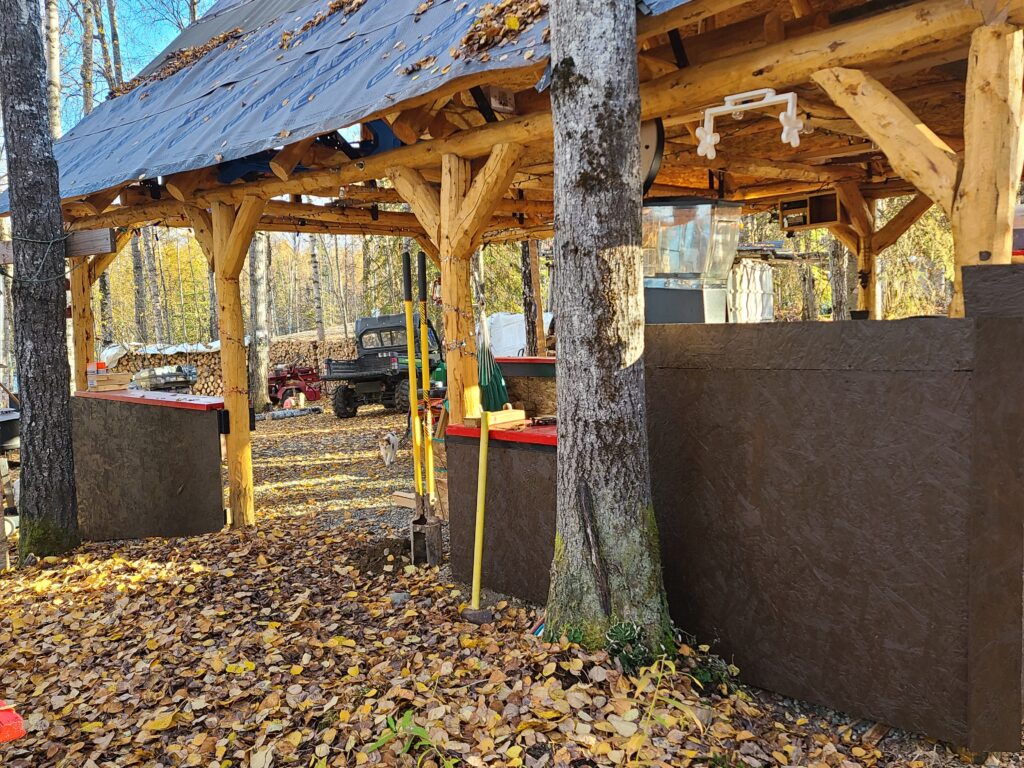
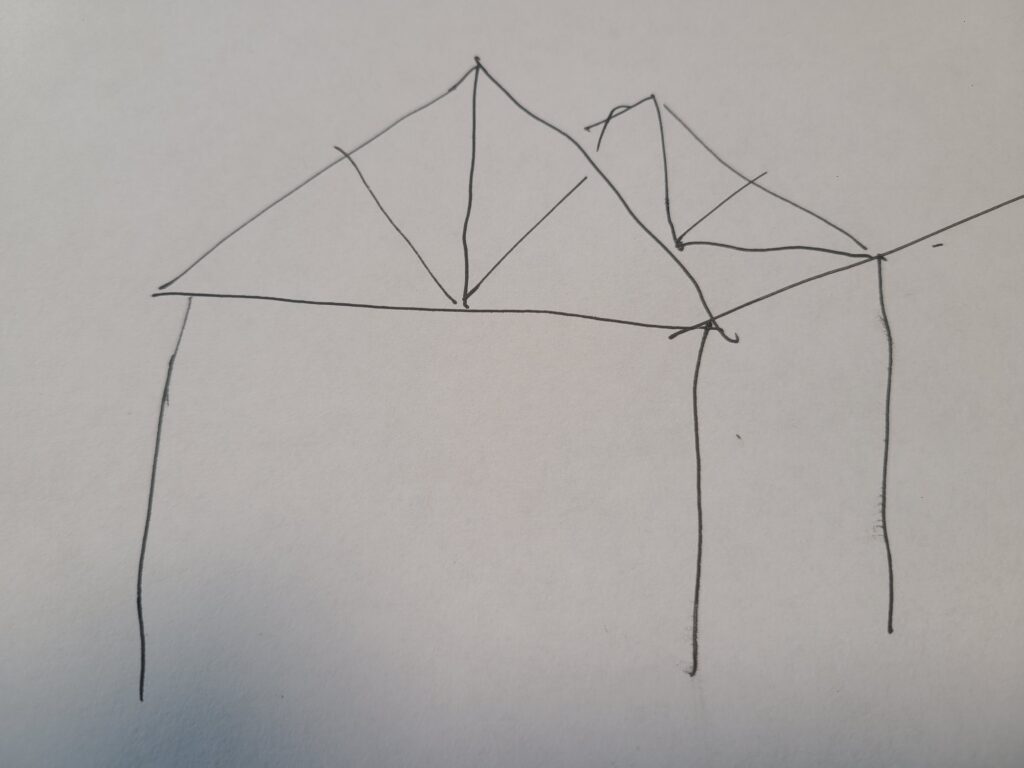
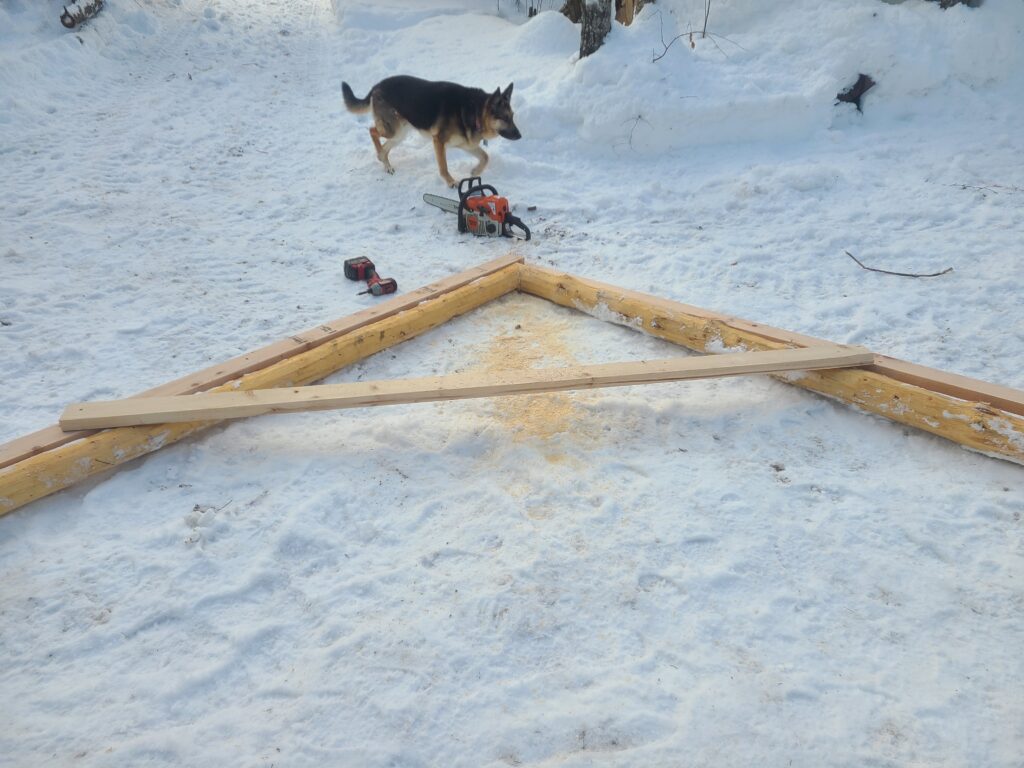
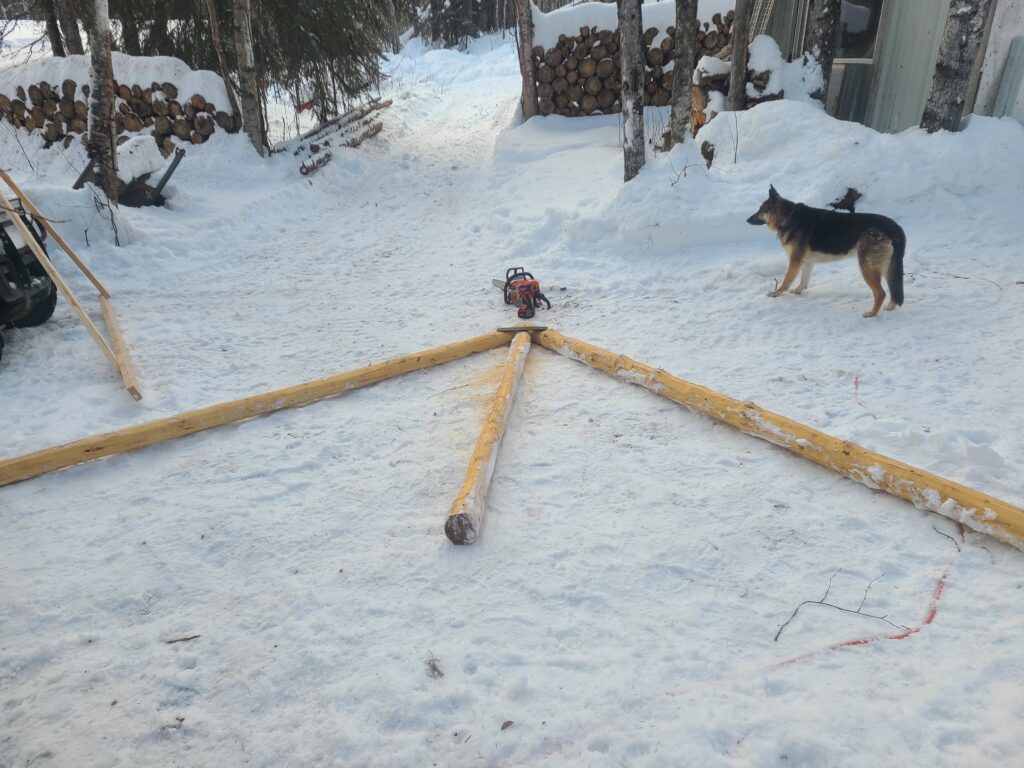
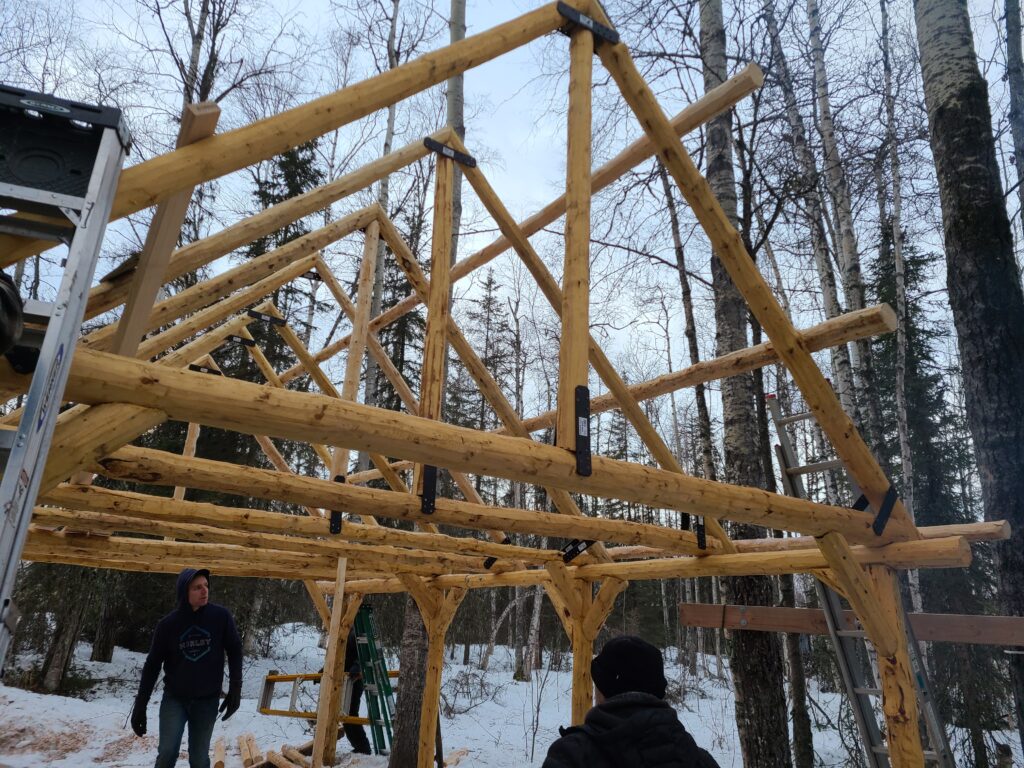
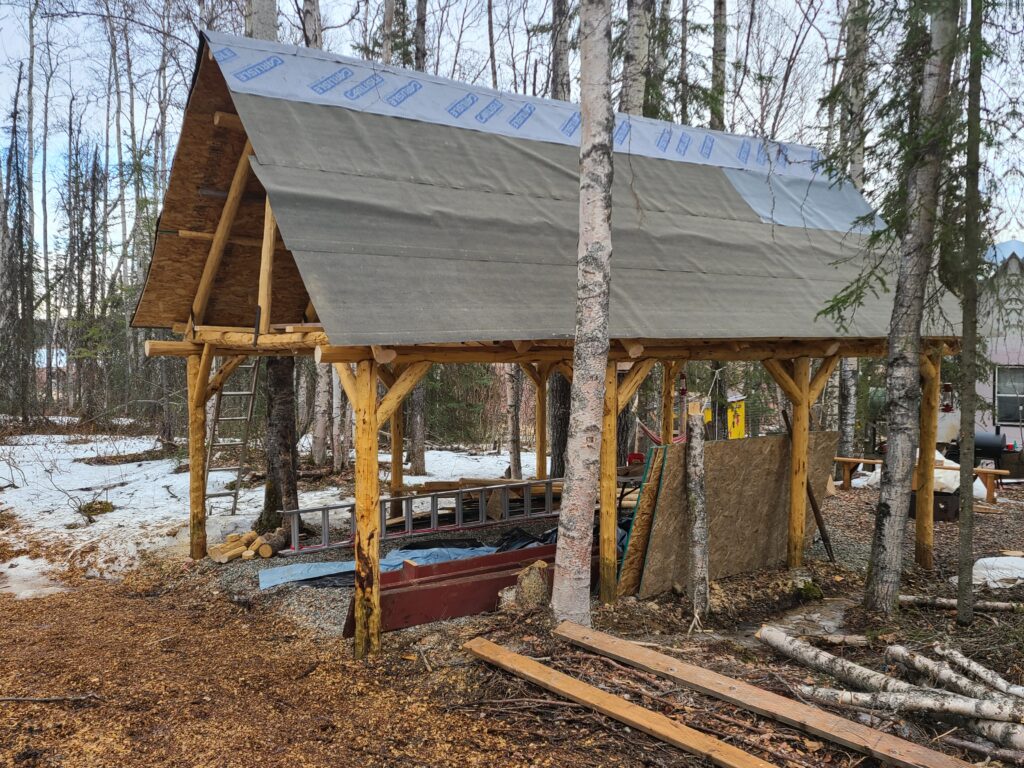
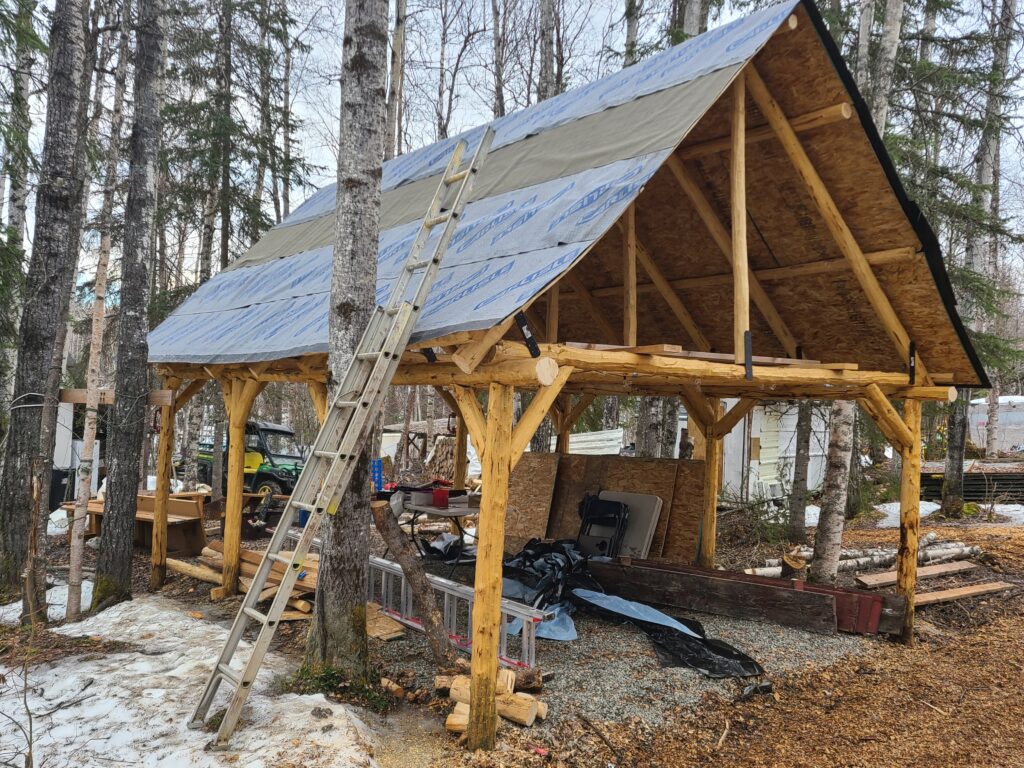
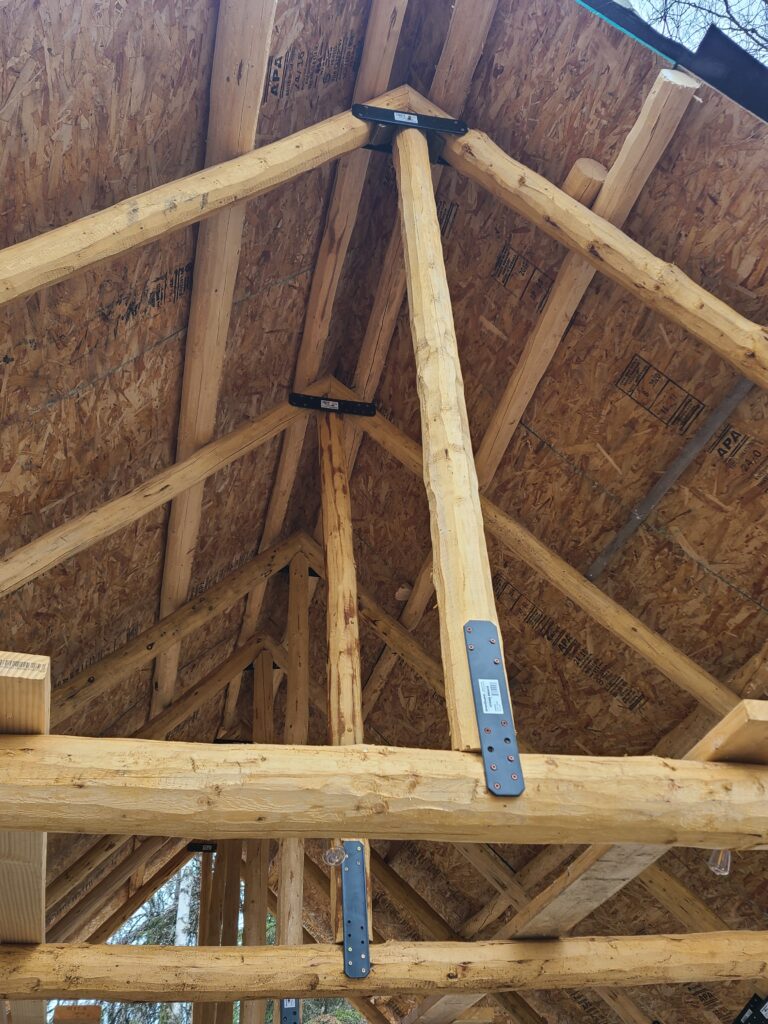
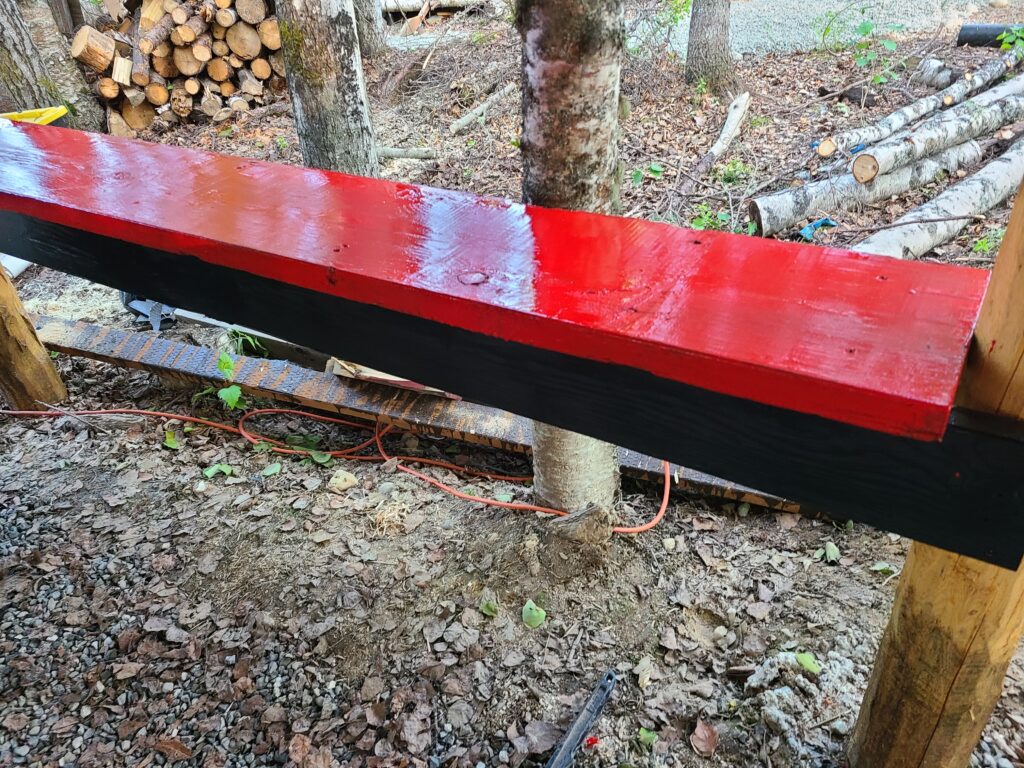
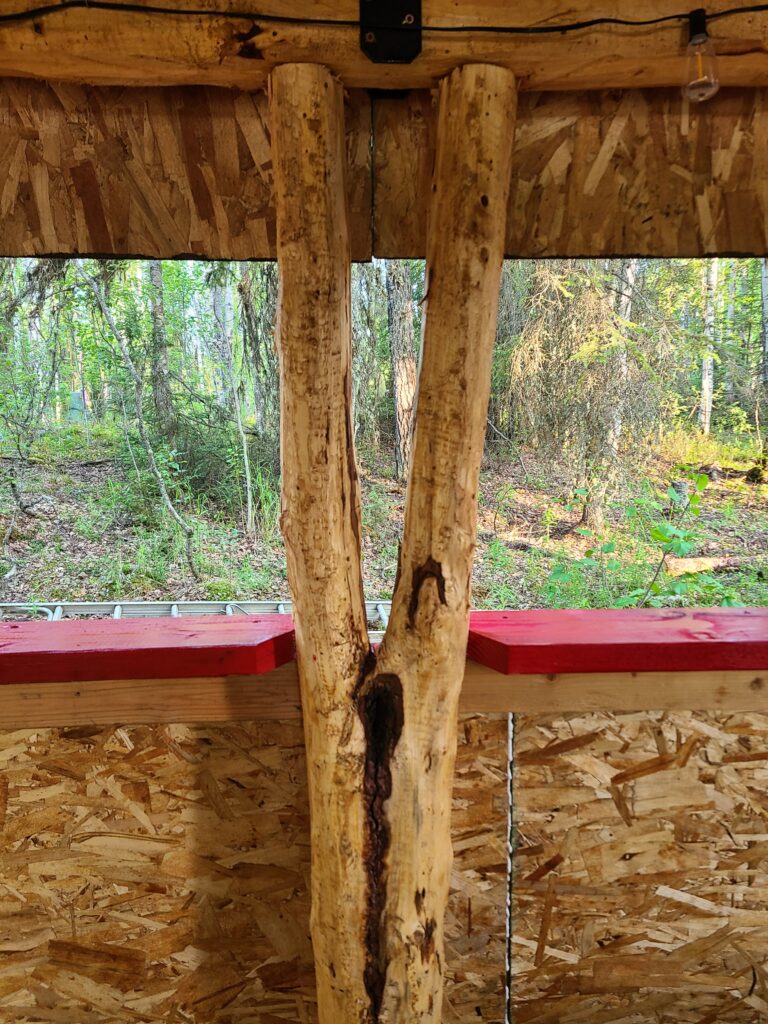
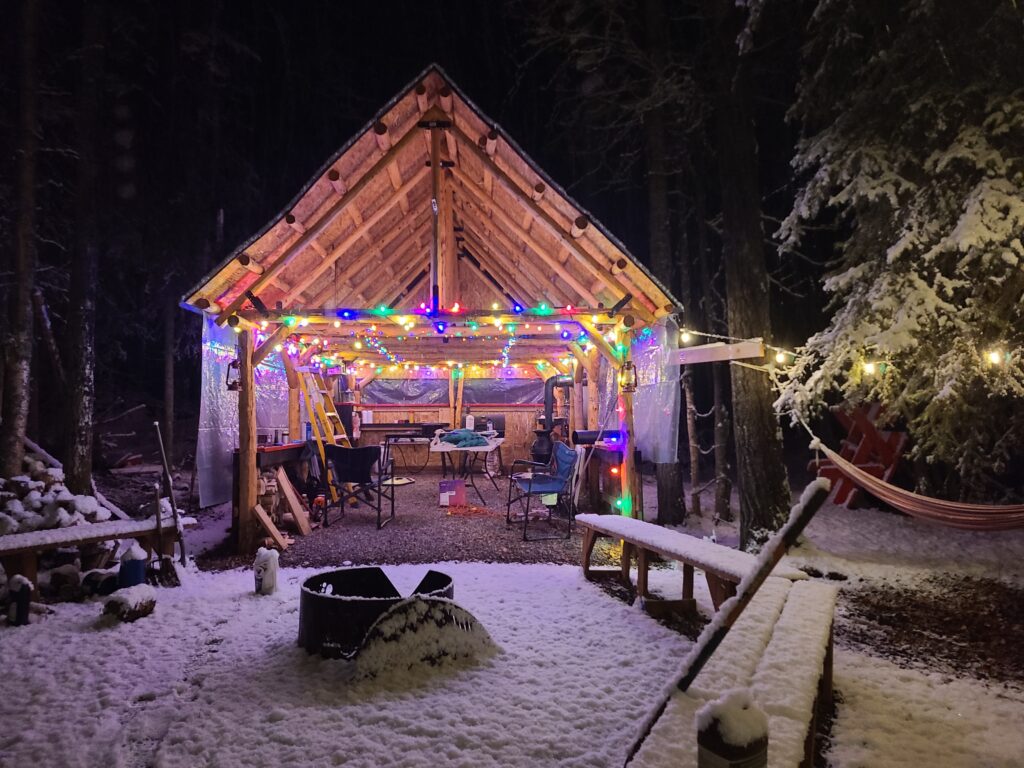
After the top plate was done and the glue had set we moved onto the rafter logs. Since not a single building material was dimensional, there were also custom cuts for every joint. There are two common ways to make a log joint, one is to freehand them using the chainsaw and your best guess while the other is to scribe the joint and cut to the marks. I freehand everything and fine tune the other areas when it’s needed. We started by placing them above the posts and then added more on the centers between the posts. This provides plenty of roof support for the snow load given that the roof was going to be a 12/12 pitch or a 45-degree angle. This means that for every one horizontal foot of roof there is a foot of fall and most standard houses only have a 4/12 pitch for a comparison making this one three times steeper. This steep pitch allows the roof to “shed” the snow, so it doesn’t overweigh the roof and that means you won’t have to shovel the roof off. It’s not a huge deal now, but it will be if I’m out there in a walker years down the road. The house has an ultra-steep 17/12 pitch, so we also wanted it to somewhat match the house. We measured the outside with each rafter and marked the exact centers so we could center the trusses later. Taking our time on measuring everything and making sure it was exact paid off as there was only half an inch difference overall for the entire length. That is hard enough to do with dimensional lumber, so we hit the jackpot with that accuracy using logs. 45-degree supports were added between the posts and any joining logs to provide more reinforcement.
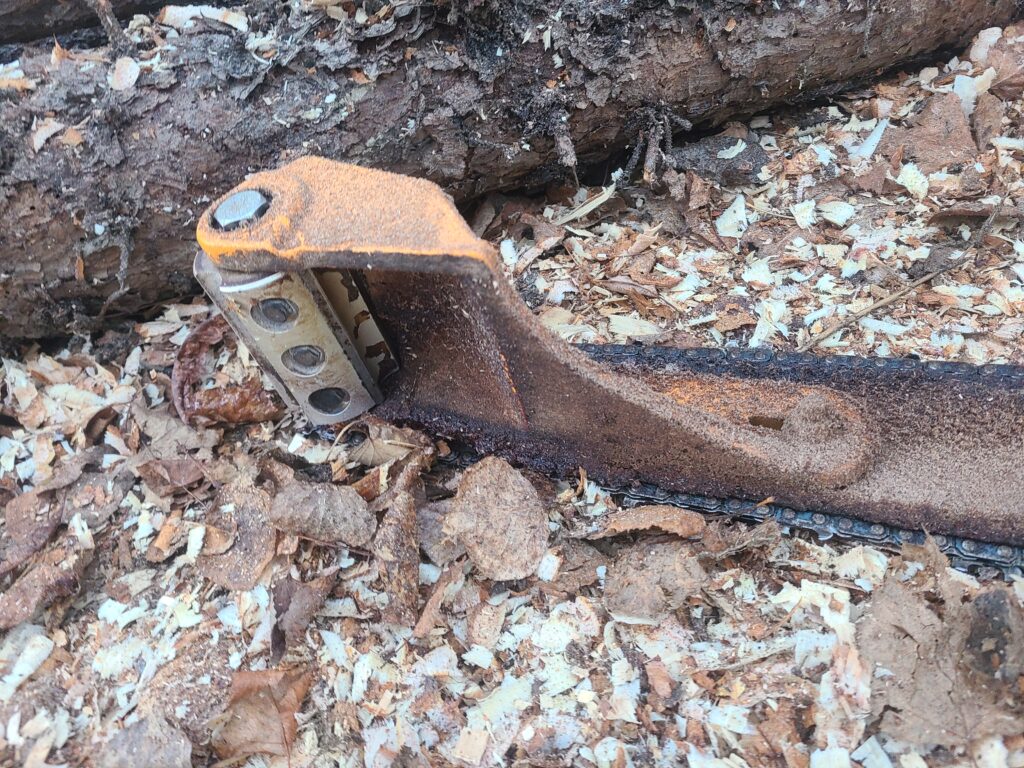
Making the log trusses was the next item to complete. There were seven in total, and I had selected the straightest eleven-foot sections of medium diameter logs for them. I drew the trusses to scale on paper and got an approximate measurement from that. I left them a little longer to adjust for trimming due to different log diameters. I built a jig out of 2X4’s to keep them the same as we made them. The flattest side of the logs were placed against both 2X4’s and I used the 45-degree angle on a square to pencil in the angles. They were then cut using a chainsaw while doing my best to keep the chainsaw bar plumb to the ground. Once the cuts were made the logs were slid together to check the fit. Most were good to go fortunately. If they are off a little bit, place the joint together and make a cut with the chainsaw so that it shaves it down to an exact fit. Multiple passes may be needed if it’s a big gap so continue until there are no gaps at all. Once the joint work is done the two logs were screwed together and a metal bar was used for bracing. A center post to help distribute the weight was going to be added later so we left room for those.

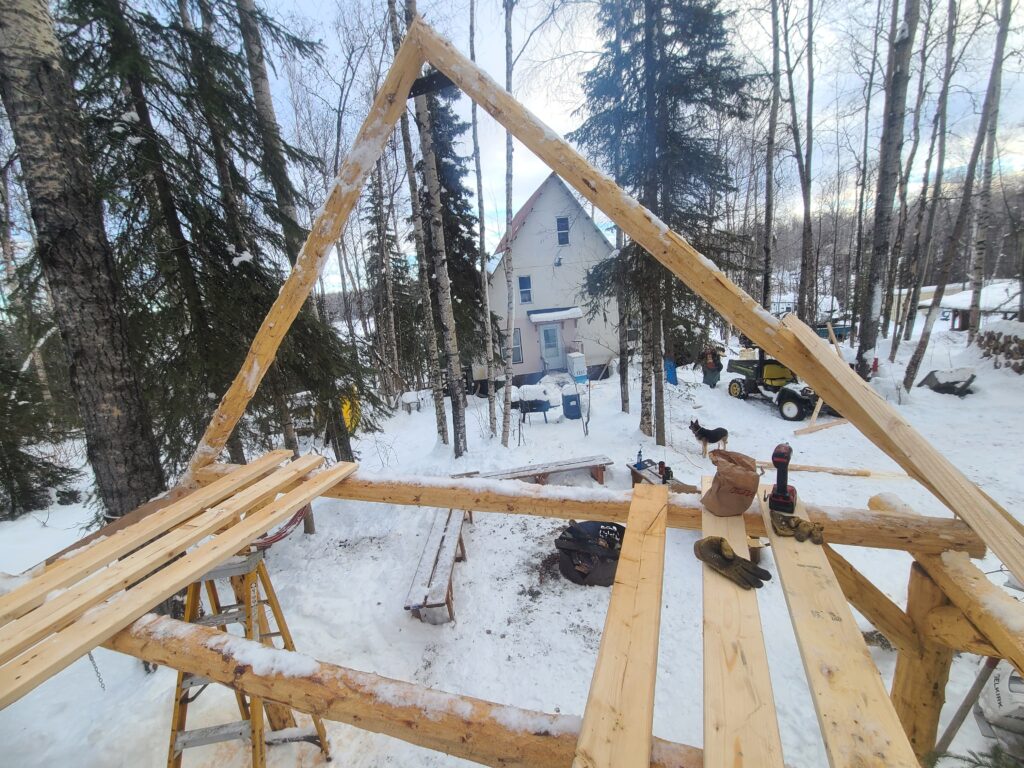
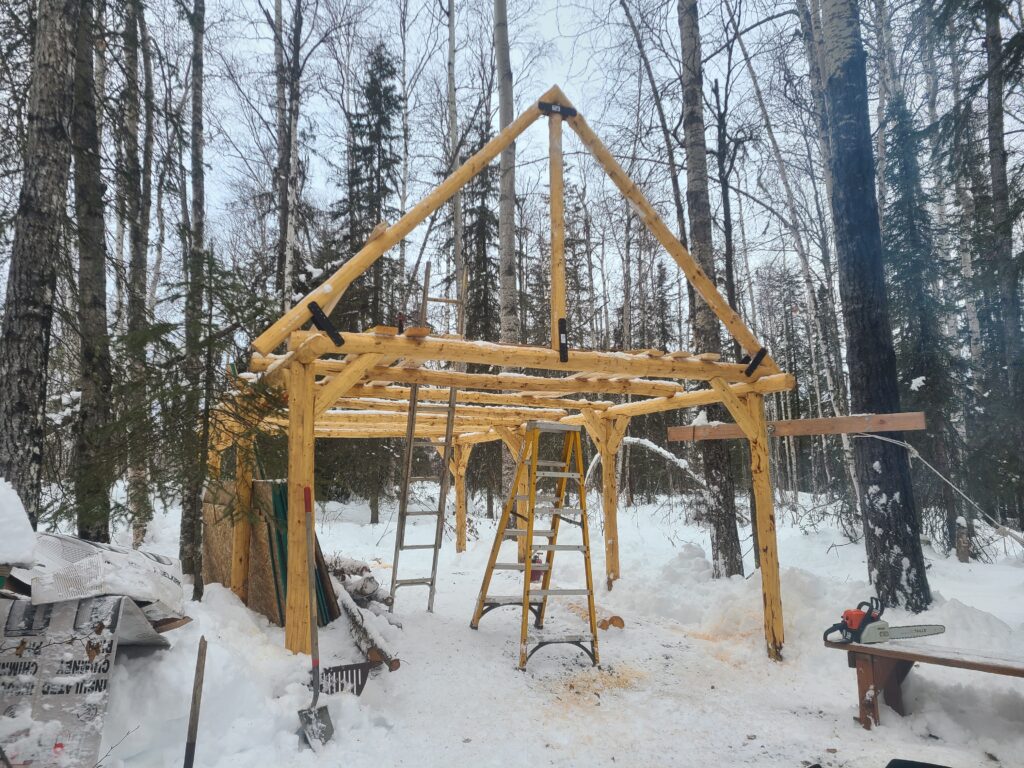
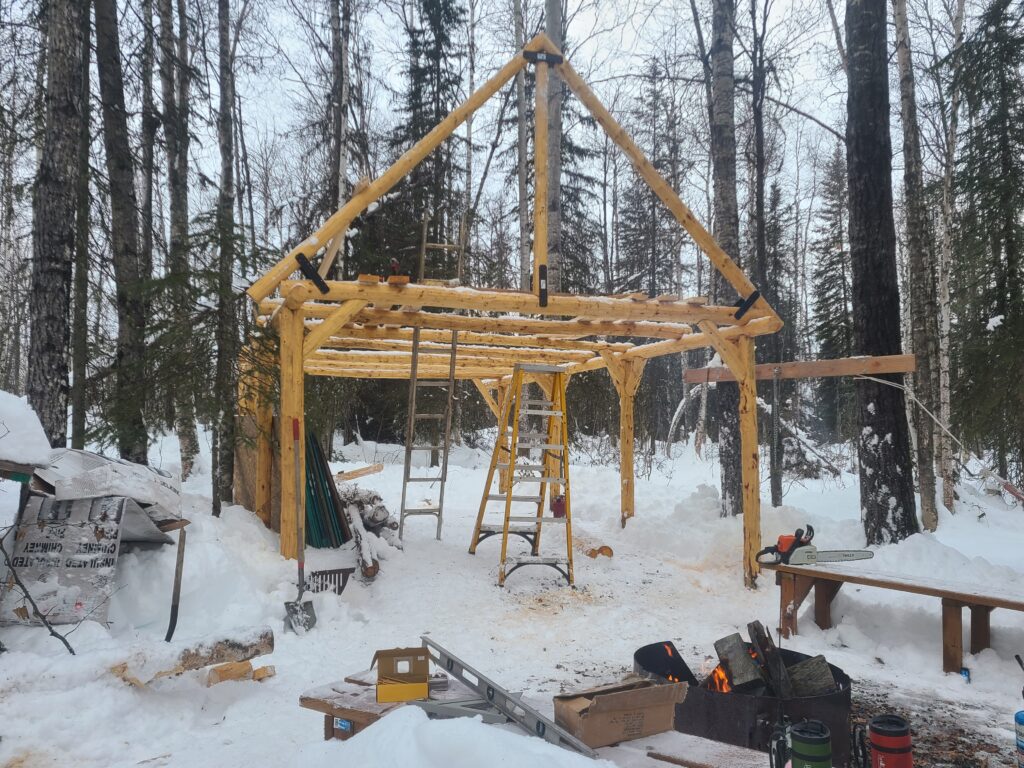
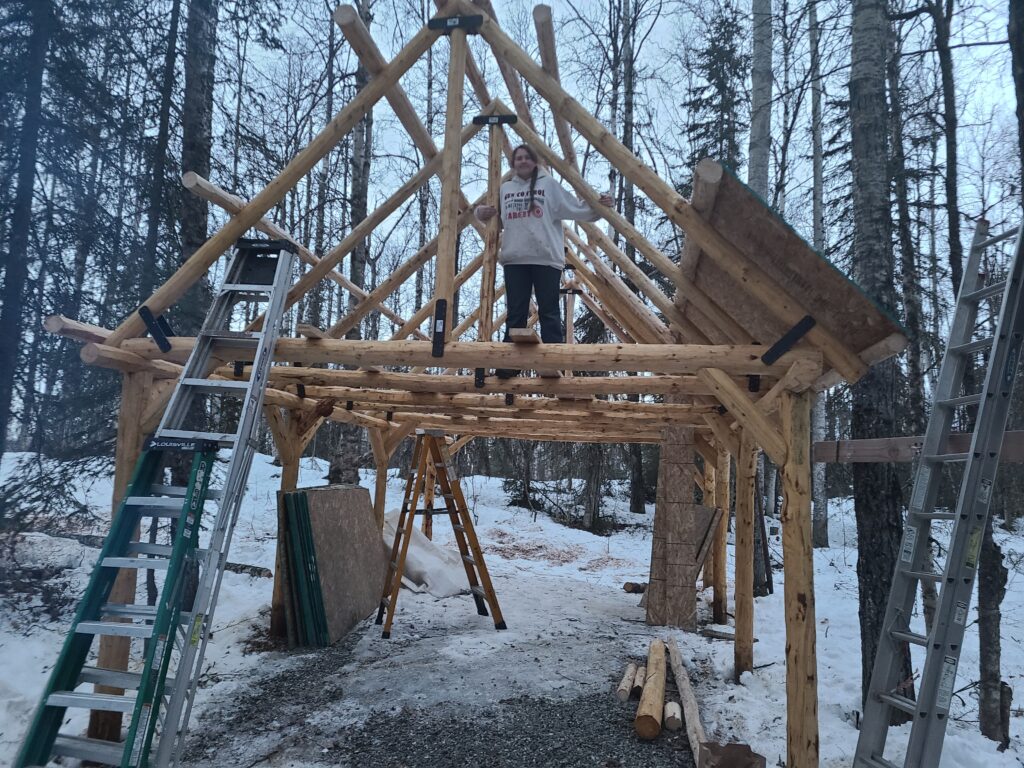
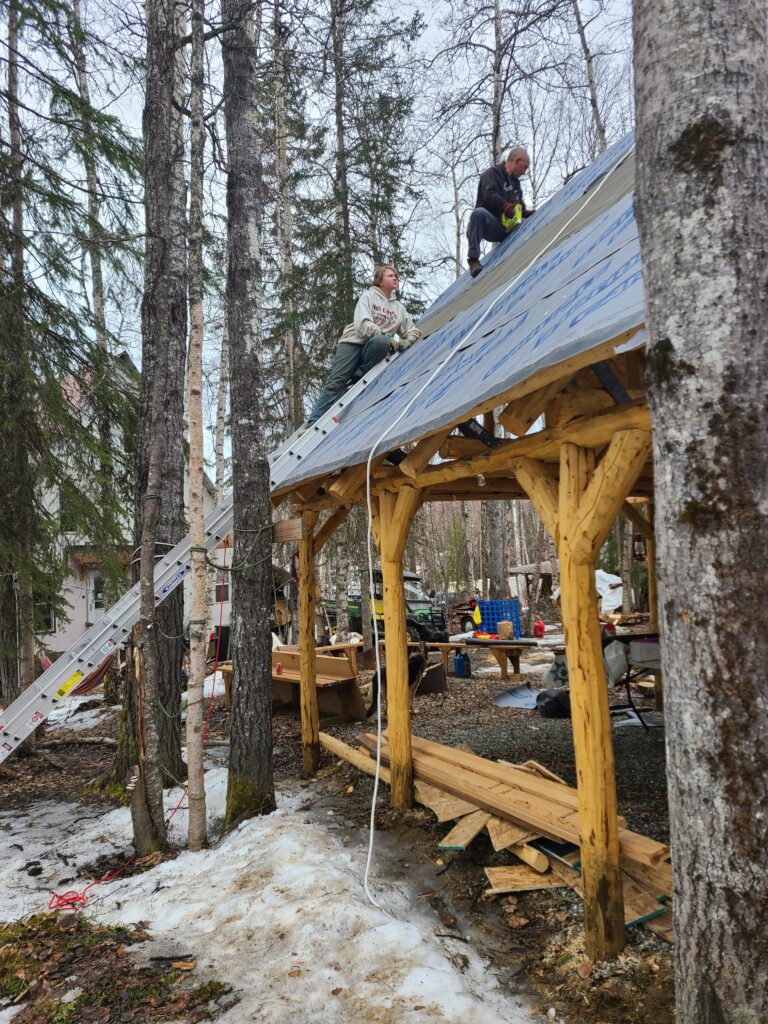
We set two of the trusses ourselves and waited for helpers before installing the rest of them. The ends of the rafters were squared off, and a wedge-shaped notch was added so that the truss wouldn’t slide off easily. Corresponding wedge cuts were made in each truss once the exact center was lined up with the marked centers below. Lining them up is a crucial step if you want the peak of your roof to look straight. Once the two joints and the centers were lined up, they were screwed into place along with adding metal bracing to stop any movement. Keeping them as plumb as possible is also critical so there are many things to line up at once. As with any freestanding truss they will move until you get some purlins attached so temporary bracing is a must unless you are super careful around them.
The center support sections can be added now or after the purlins are installed. I opted to wait for the purlins as the trusses were very tippy without them so waiting would make it easier in this case.
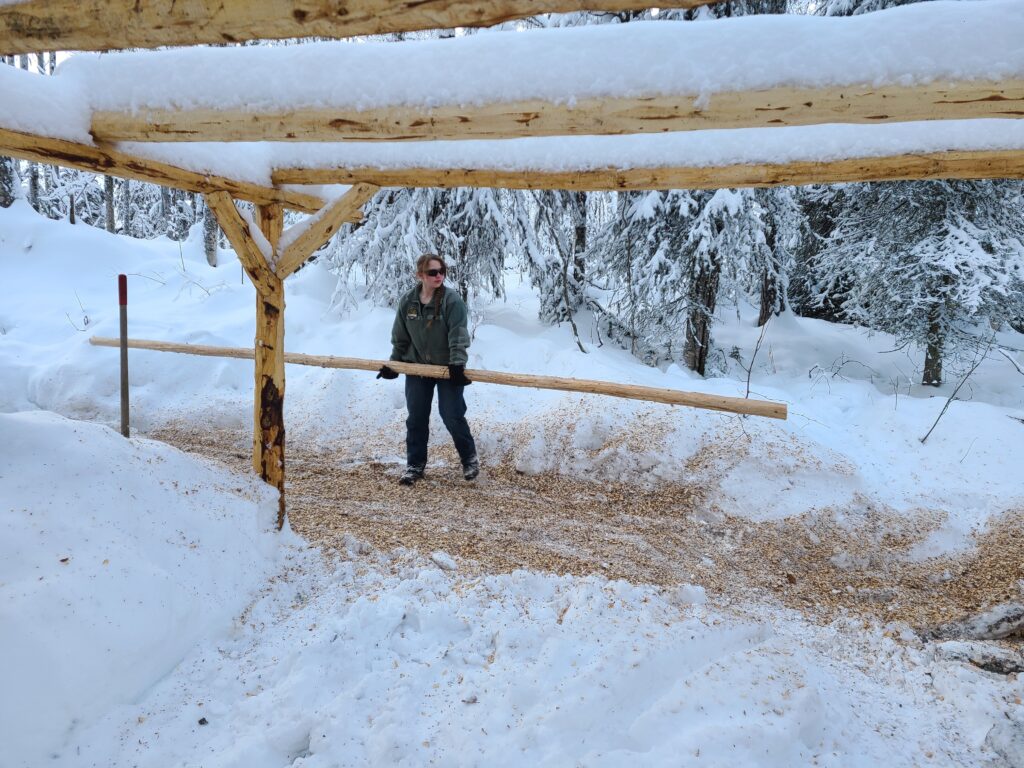
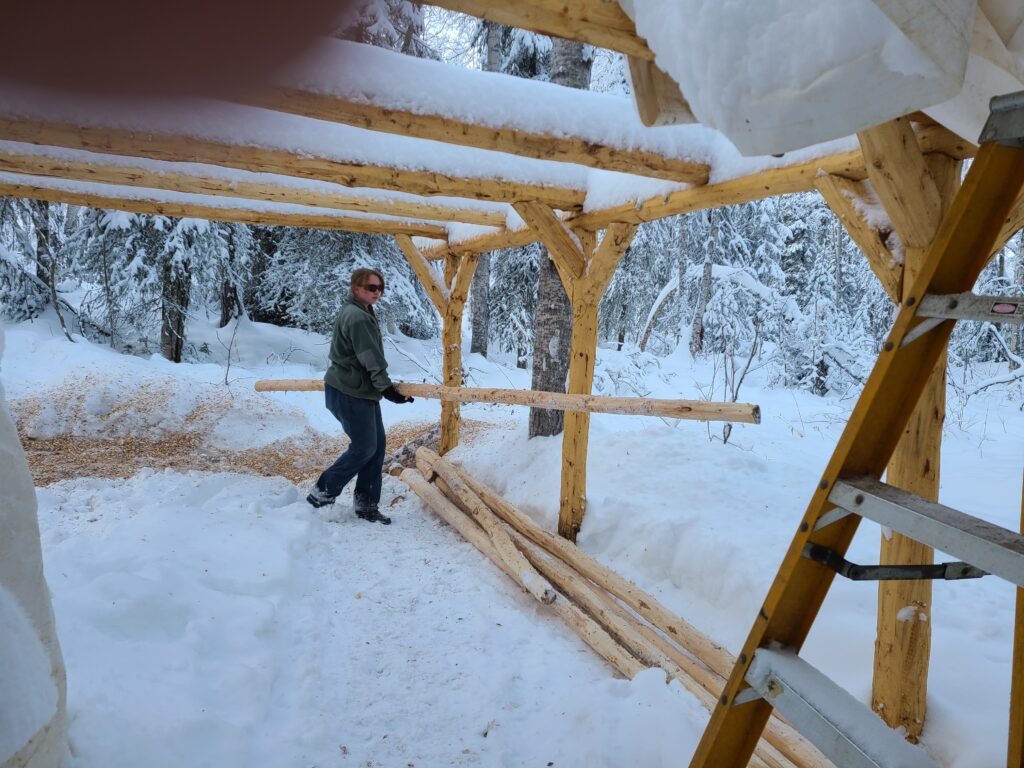
Thankfully we had lots of helpers when we put the remaining trusses and all the purlins up. The purlins were the smallest long straight logs that I could find. The plywood or OSB would be attached directly to them so finding the straightest ones was important. The joints can be place in the center of the trusses so many shorter straight sections can be joined together to make a long straight run. The purlins were added at four-foot intervals for the plywood width. We had help so I figured that I would put the middle purlin sections in later by adding short ones in between the trusses. Our helpers were also able to get one row of OSB sheeting put onto one side of the roof. The OSB was another blessing as we got it for free from a friend. We later ended up only buying two sheets to cover the end and the bottom, so that also saved us a ton of money.

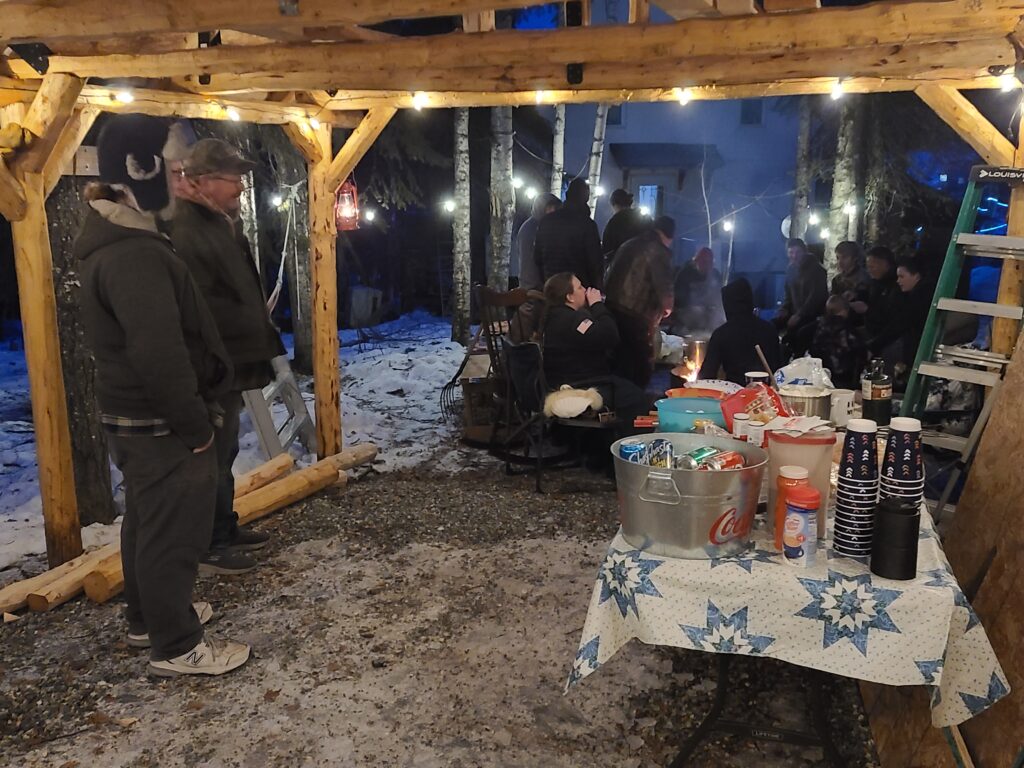
The helpers had all the homemade pizza they could eat along with a hot campfire and all the coffee they could drink. We couldn’t have done many of these projects by ourselves, so we wanted to make sure they were taken care of good while they were here. Homemade pizzas are better than store bought and way cheaper too.
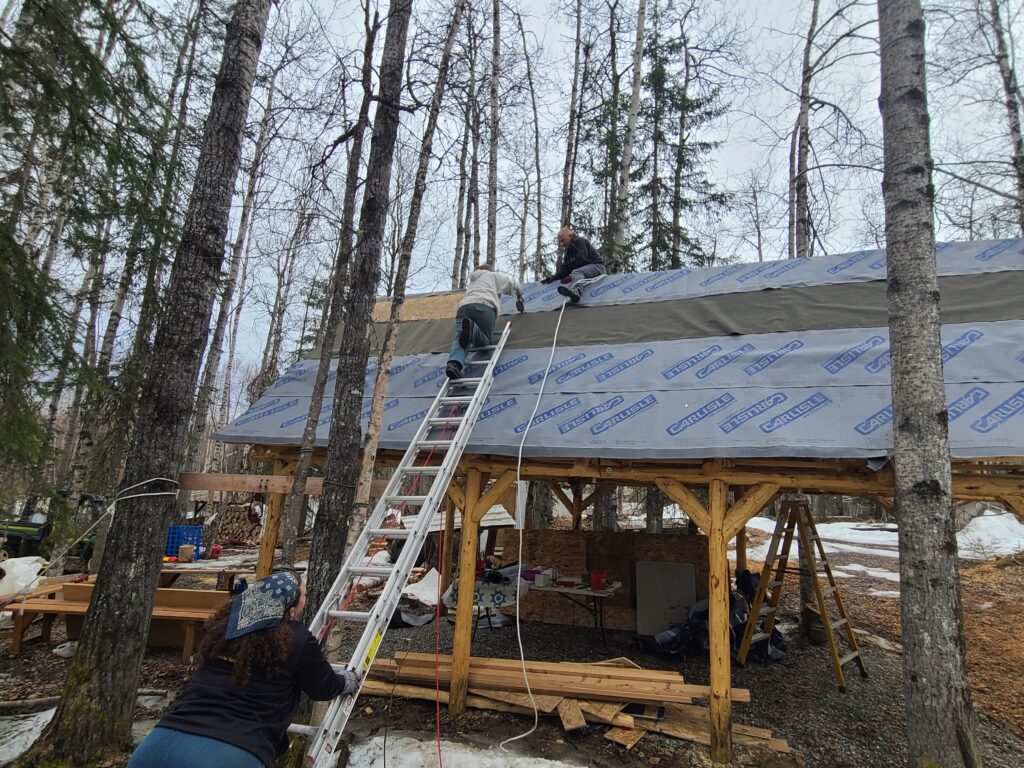
We finished the roof sheeting ourselves over the next few months as the weather allowed us to get it ready for tar paper and metal sheeting. We got a good discount on the heavy-duty ice dam roof underlayment, so we used that as it’s way better and thicker than traditional tar paper. That got it dried in so we could begin working on the inside.
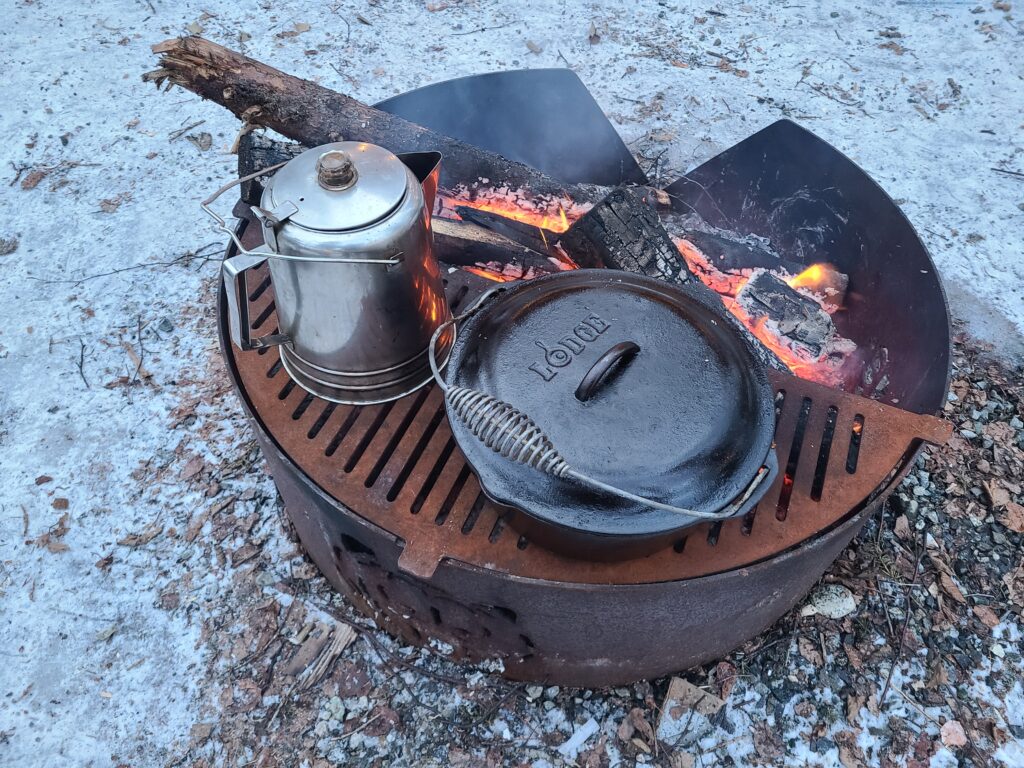
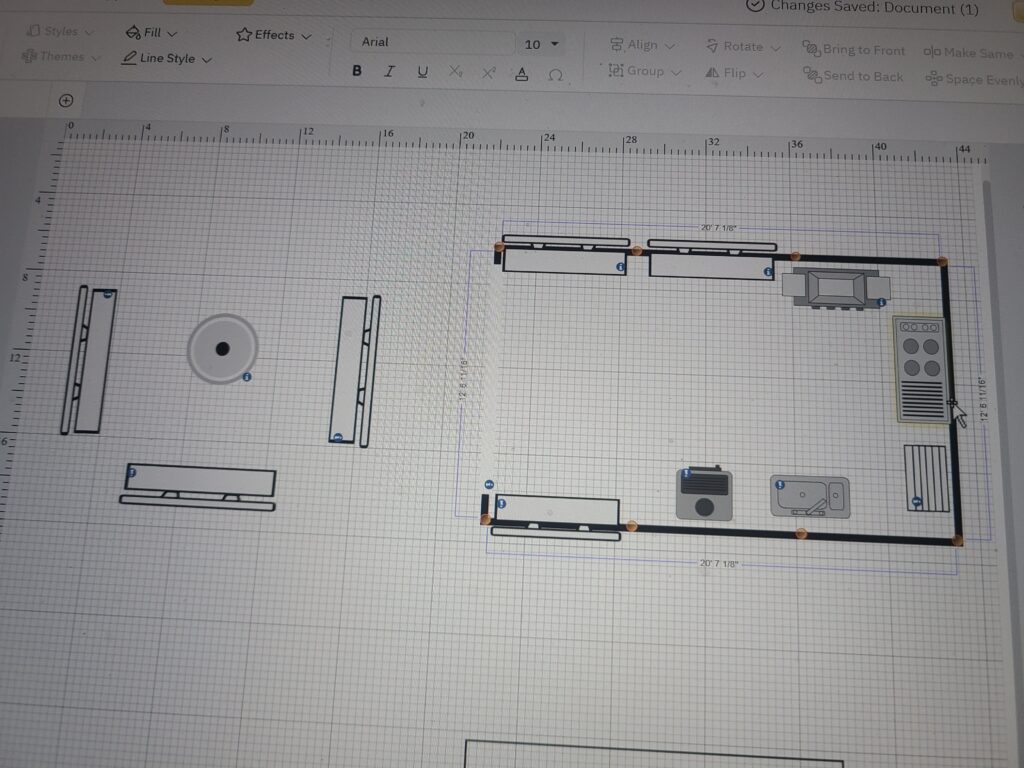
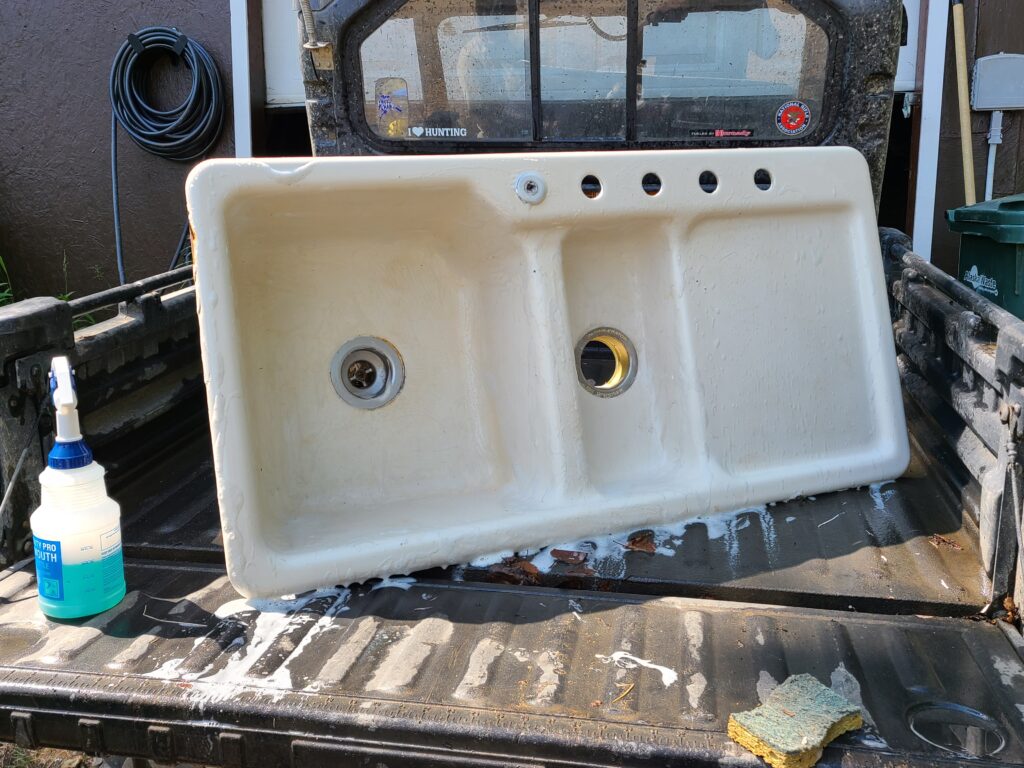
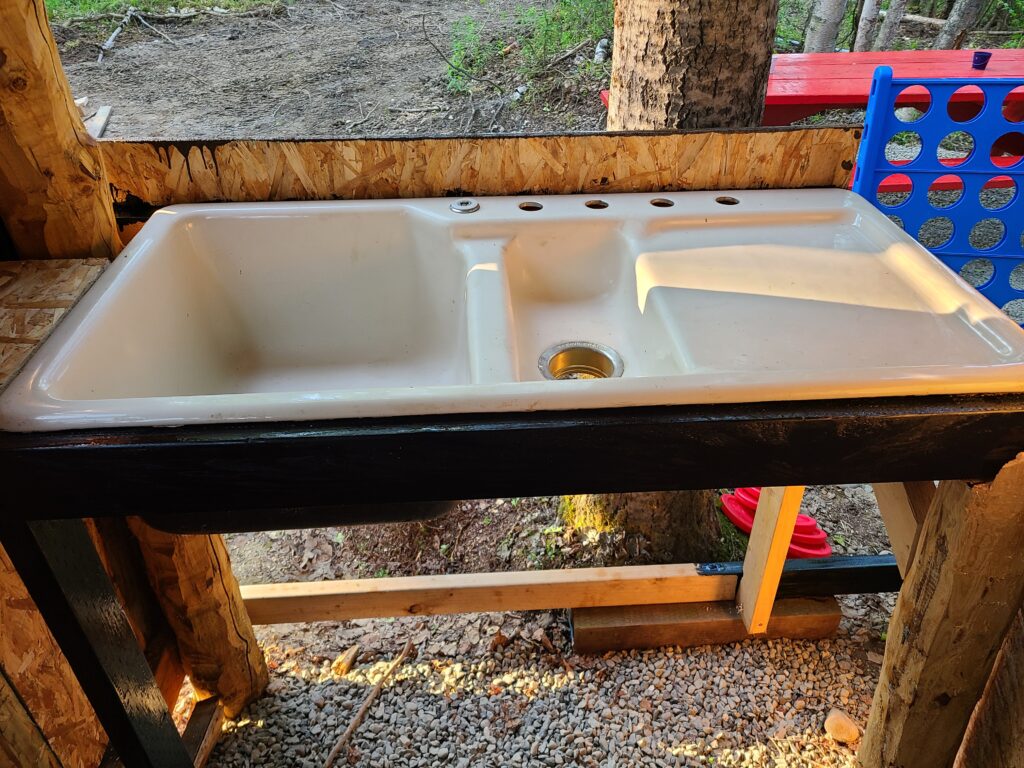
The inside layout was drafted to provide cooking areas for the 3 burner Camp Chef stove and a charcoal grill that we picked up at Lowes for a super sale price of $35 on a closeout sale. There was a heavy-duty cast-iron sink laying in one of the rooms of the house when we bought it, so we incorporated that into the design too. It needed some cleaning, but the price was right. Adding shelves and custom storage areas was also a priority to open up as much space as possible for gatherings. As with any custom project don’t be surprised when your plans on paper don’t work perfectly in the real world. That’s especially true when working with logs.
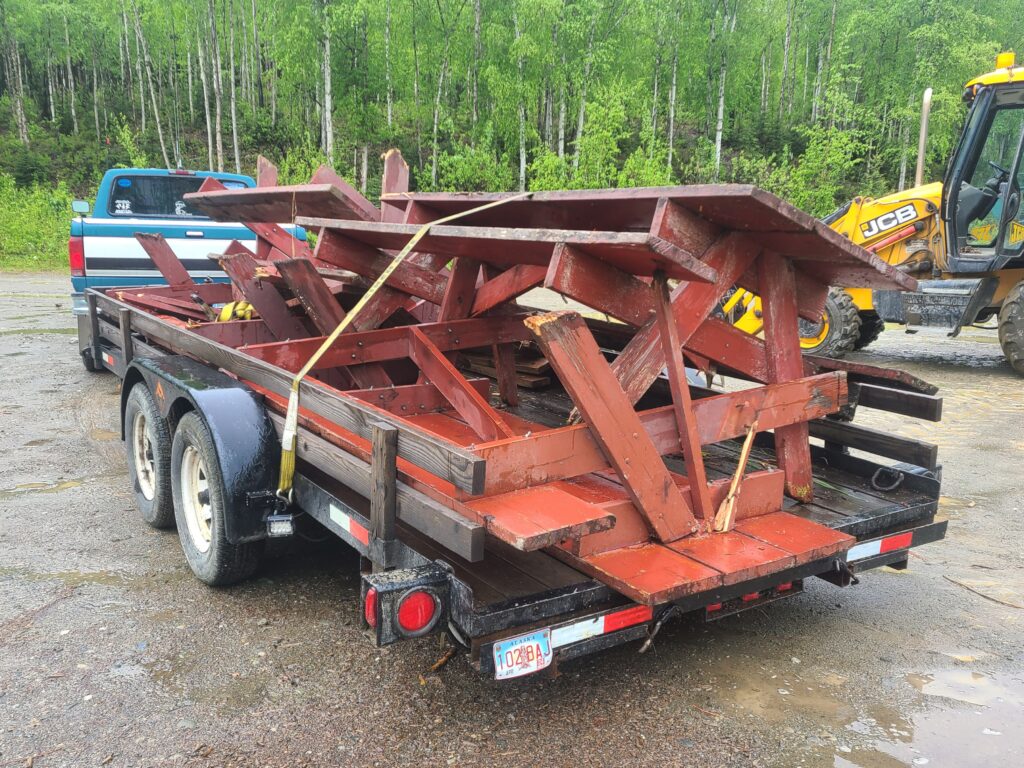
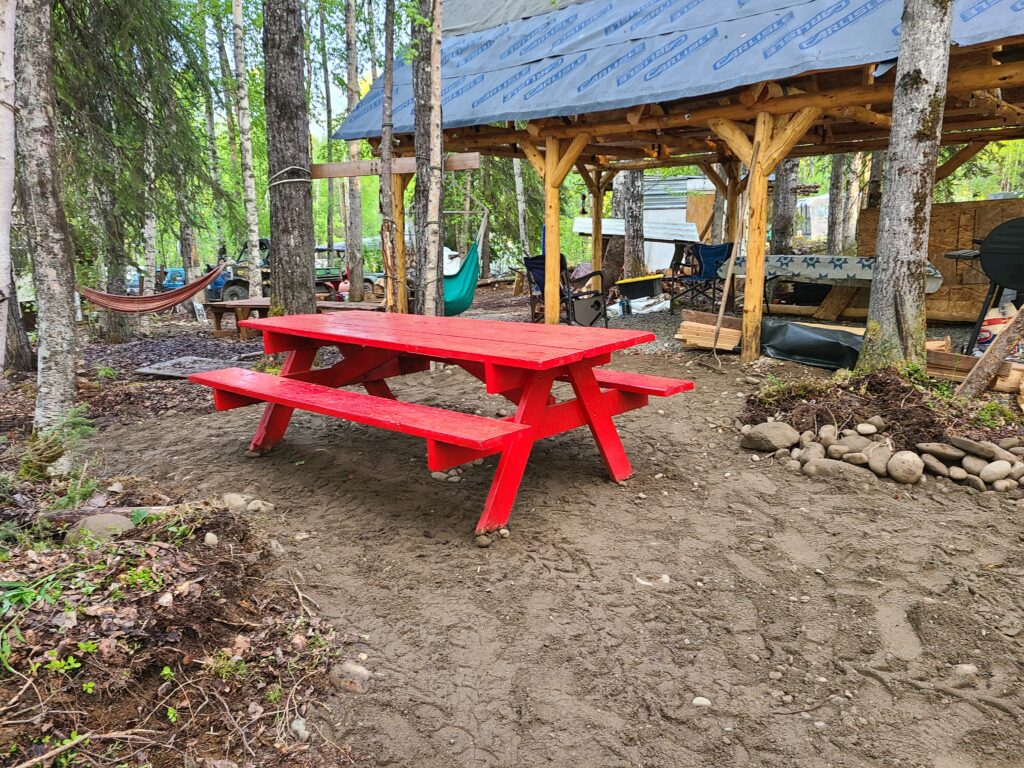
We scored a trailer load of old partially rotted out picnic tables that still had a couple useable planks in each of them so I brought them home with the idea of adding high benches for seating that could also be used to make a buffet style food line along the long sides of the pavilion. I salvaged just enough solid planks for the benches and was even able to piece several picnic tables together to make one good one to use. It was a lot of work sorting out and replacing the rotten planks, but the free price made it worth it seeing how expensive lumber, and everything else, has gotten.
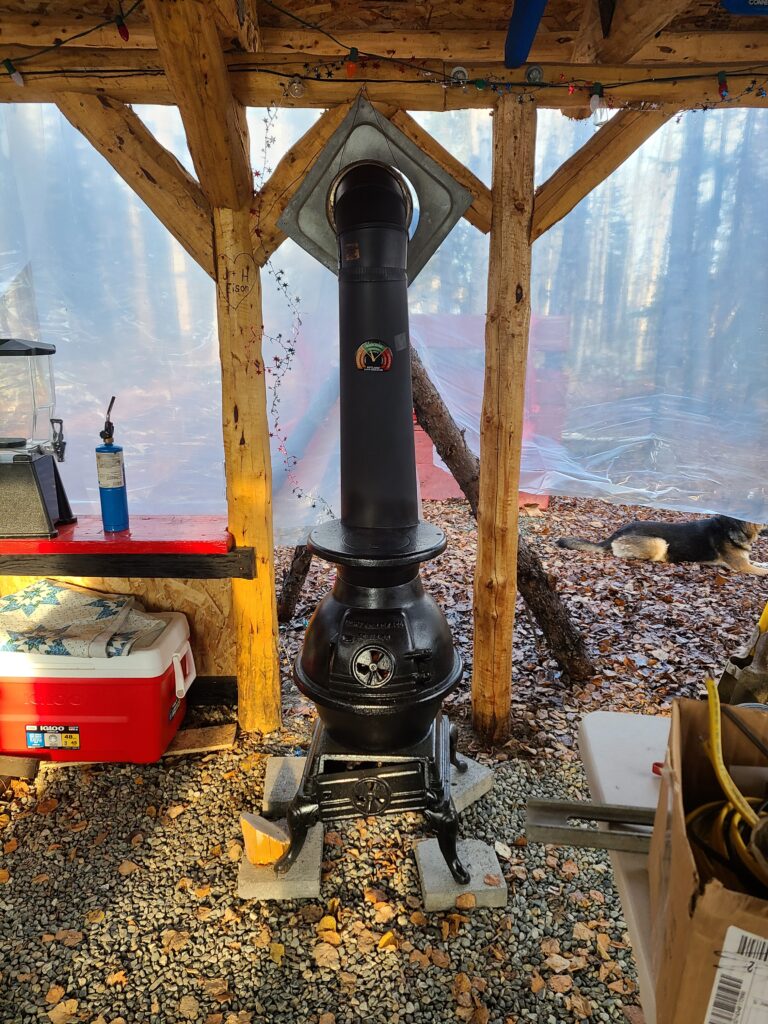
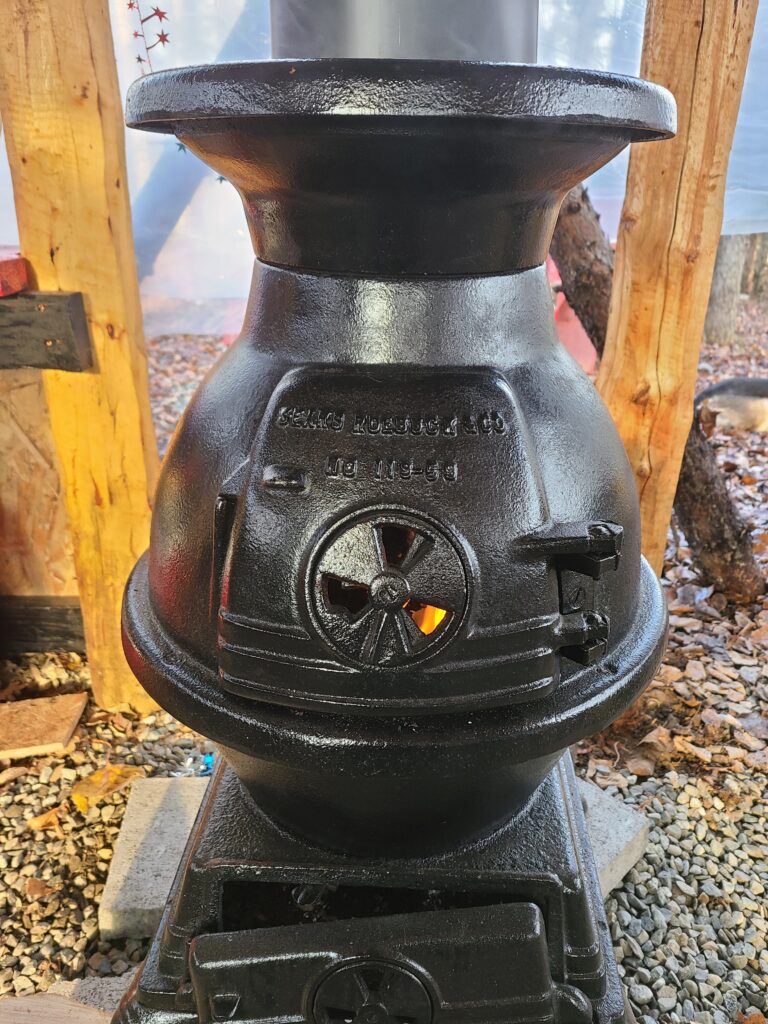
I bought 2×6’s to run in between post to mount the planks to as well as framing in the sink too. It’s a dry sink as there is no way to keep it from freezing in the harsh Alaskan winter, so we didn’t even try. I also tried planning the board placement to where we could staple some clear plastic on during the winter to keep some heat in from the old, restored pot belly stove that we would be installing later. The pot belly stove was given to me years ago and we brought it with us so it could be restored and used. We were given some free stove pipes and a pipe mount, so we only had to buy a section of single wall stove pipe and some high temperature paint.
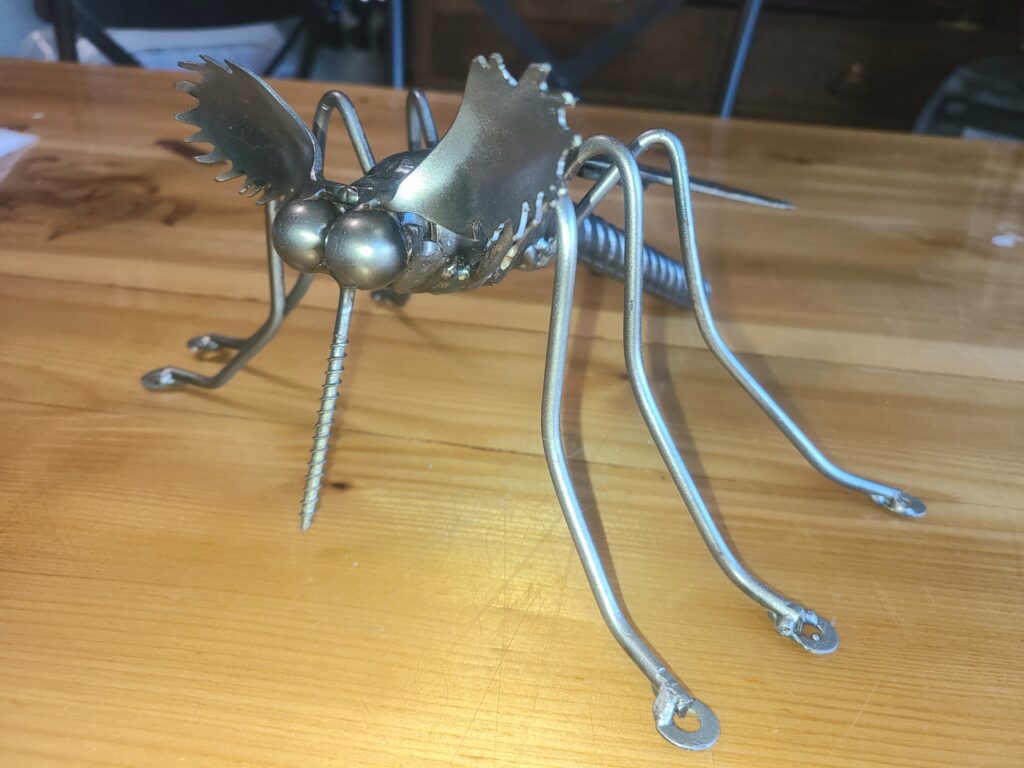
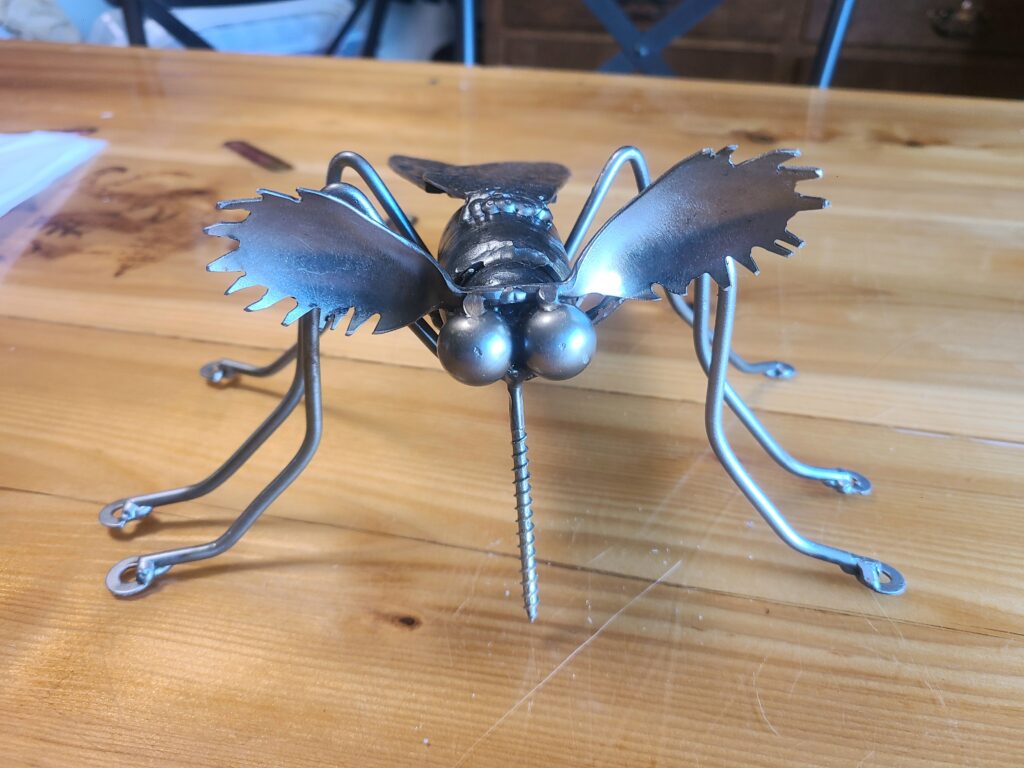
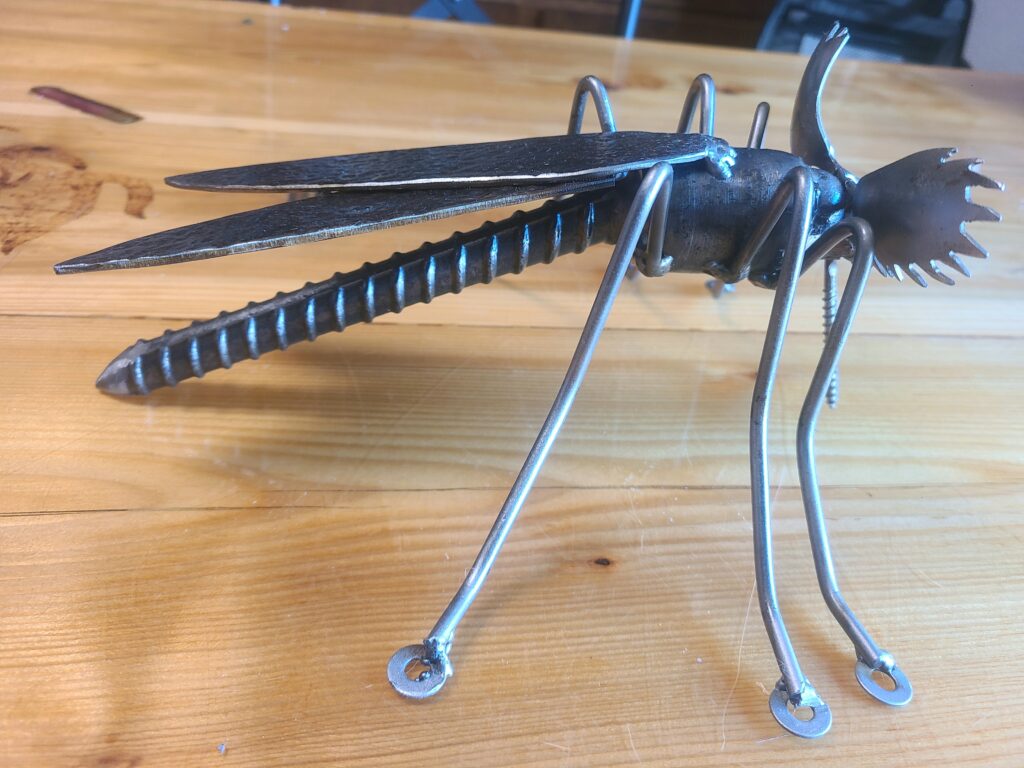
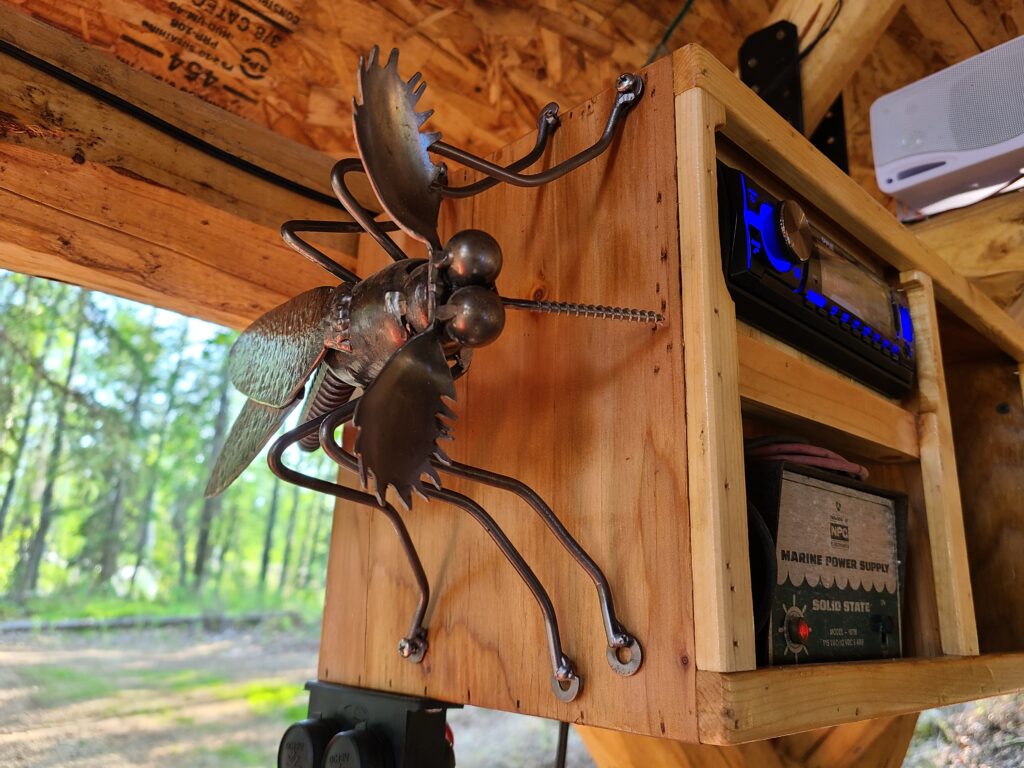
Other inside finishing touches included a built in removeable silverware drawer that doubled as a serving bin, a custom knife block made from the 4X4’s that we used for platform supports in the shipping container when we moved, a custom stereo cabinet, and many other little touches. A friend gave me a steel “Moosequito” sculpture which is now mounted to the side of the stereo cabinet. We also left an open space overhead by the cooking area where we could later hang a movie screen for a projector on future movie nights. The stereo is a high power 100-watt unit and we got both Bluetooth adapters and long RCA cables so the movies could be heard through the stereo system regardless of whether they were being played on a DVD player or being streamed on the computer. We have a large commercial popcorn maker that cranks out popcorn so snacks on movie nights will never be a problem.
We did not run a power wire to it so we are using a heavy-duty extension cord to get by until we can. We added wiring knowing that future permanent power would be coming eventually. I added many plugins where food serving items such as coffee pots and crock pots would be used and other plugins where they could be easily reached. A plugin with built in USB ports was also added to make phone charging easier. Another plugin was added where the projector will be mounted to one of the trusses. The lighting switches control plugins where either the Edison style LED strings or the Christmas lights could be switched on and off depending on the season.
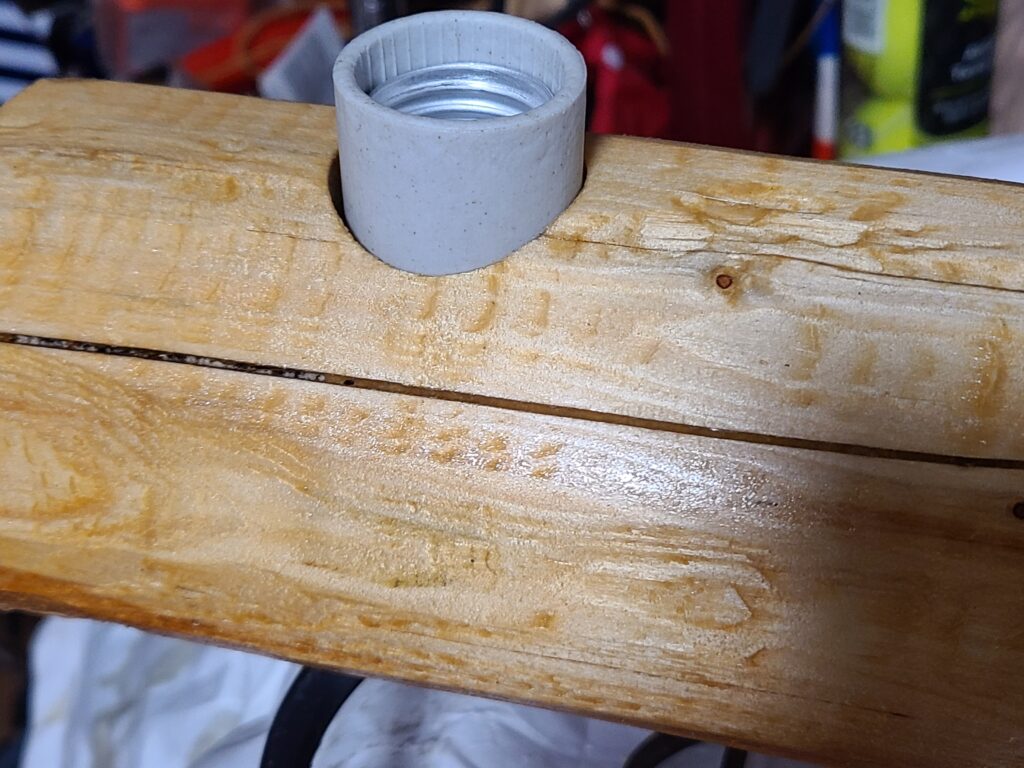
I made a log light fixture to put above the cooking area so we could see better while cooking on the dark winter nights. I used a small Black Spruce log and partially recessed three standard bulb bases into. Holes were drilled so that the base could be mounted with a hollow threaded rod that allowed the wires to pass through it. The wires on the top side were hidden by carving a small channel out with the chainsaw so the wires would be out of sight at ground level. Decorative chains were used to hang it from the purlins, and it definitely contributed to the overall rustic log feel that we were trying for.


We covered the side gaps with clear plastic for the winter and fired up the pot belly stove for a test run. It did stay noticeably warmer inside, but we also found out that we need to cover more gaps before the real cold weather begins. It won’t keep it super toasty and hot inside, but it will still be way warmer and gives everyone a place to warm themselves with a nice hot stove. Jessica is making a nice big sled run since we have a hill for it. Get togethers in the winter are fun too and we can also watch the Northern Lights as a bonus!

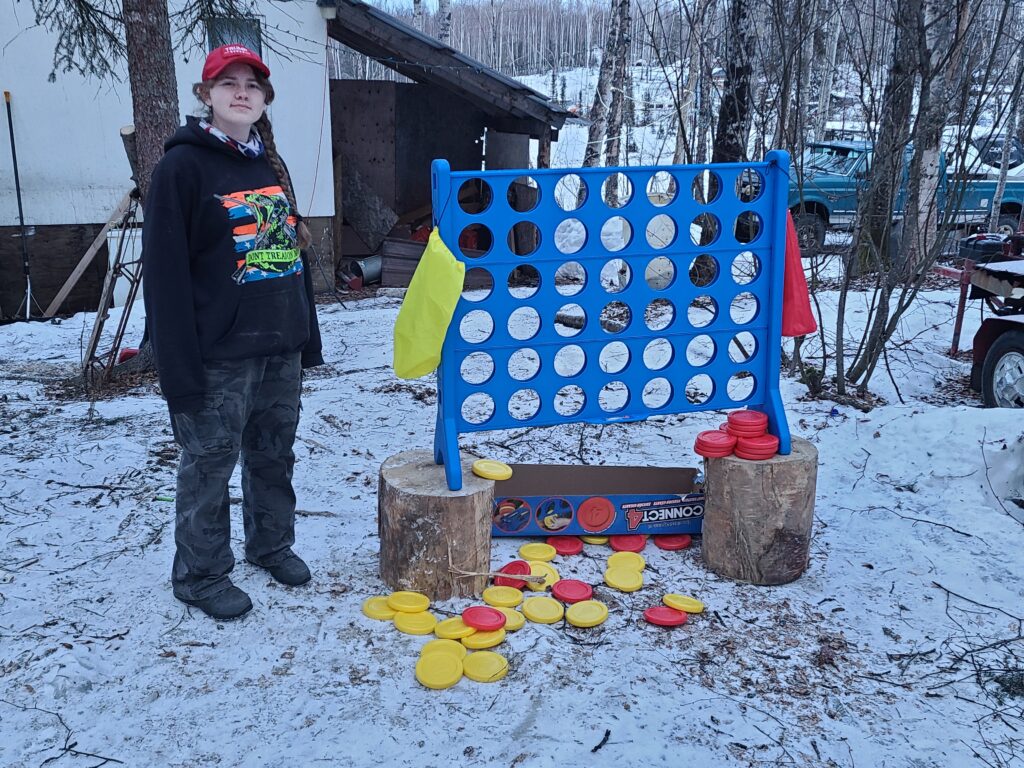
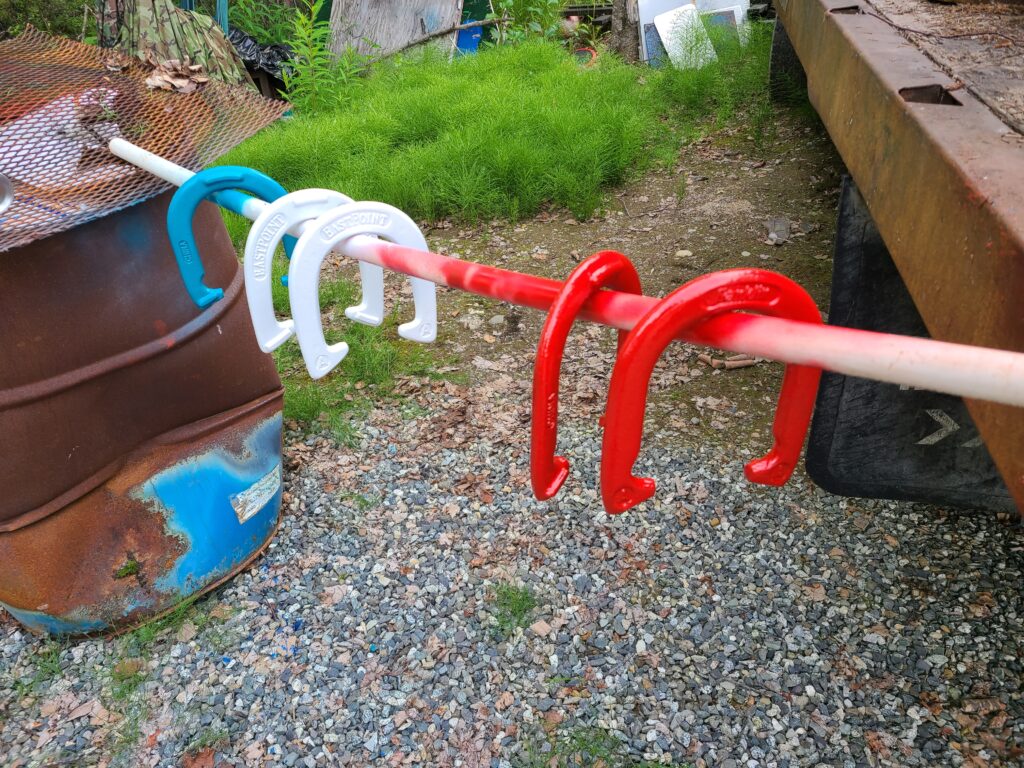
We broke ground for this in August 2024 and completed all the major work in July 2025 making it an eleven-month project from start to finish. Almost all the materials were free and even most of the wiring components were leftover pieces from other projects, so we only have to spend about $500 total for screws and roofing. There was an unopened five gallon can of log finish in the house when we moved is, so even the finish was provided. We started collecting outdoor games such as a large connect four, a foosball table, and others so people could have fun while they’re here. This also gives the youth group leader lots of options for planning fun youth group activities year-round since we have both a fire pit and woodstove for the wintertime. The church we attend doesn’t have a good area for those events unless it’s a dry warm day, so this will help out. Overall, the project wasn’t overly complicated but was extremely tedious with all the custom joints and log peeling. The Lord definitely helped us all the way by preventing us from building this before now and by supplying nearly all the building materials once we started the project here in Alaska. Hopefully this will give you some ideas and pointers to start building stuff.